Wednesday 30 October 2013

Heartfelt Creations Wednesday

Happy Wednesday everyone......It is a special day for me today as I can announce that I will be continuing on the team for another 6 months:) So very happy and honoured to be part of such an amazing company and to get to play.....ooohhh I meant create with all of there gorgeous products:)
It is so very sad to see some of the very talented team move on, however when one door closes another one opens and I am sure they will all do well in whatever path they decide to follow. I wish them all the very best x I would like to also congratulate all the new semi finalists who made it on to the team. They are all so very talented and I am sure they will bring so much creativeness to the team:) To see who will be joining me over the next 6 months hop on over to the Heartfelt Creations blog. Also check out all of this weeks gorgeous creations!

I also hope to be able to share with you all soon some more exciting news, but until then here are 2 projects that I would like to share with you all:

 
Double Heart Wall Decoration


I have used the Sweet Juliet die to create these beautiful flowers:


Heartfelt Creations Products Used:
HCD 237 – Sweet Juliet Die
HCDPC 1  237 – Antiquity Paper Collection
HCPC 3535 – Sun Kissed Fleur Tags and Basket Pre Cut Set
Other Products Used:
2x MDF Hearts (one smaller than the other), Archival Ink – Plum, Stickles - Platinum, Cosmic Shimmer – White Ice, Pearls, Brads, Decorative Pearls, Pearls on string, Satin ribbon, Twine, Strong wet glue
Instructions:
Cover your 2 hearts in your chosen papers from the Antiquity Collection. Adhere the smaller one on top of the larger one adhering it just over the edge.  Die cut 2x small flowers and 2x large flowers and make them up, use a brad on each through the centre of each flower to hold them together. Add some glue to the flowers and sprinkle some of the Cosmic Shimmer White Ice.  Die cut out about 5x foliage from the Sweet Juliet die in some of the deep plum patterned paper.  Stamp the Sun Kissed tag stamp and fussy cut this out. Cut the ‘Believe sentiment from the paper collection.
Put all of these elements to one side.  Add the pearls on string to the outside of the hearts.  Adhere the ribbon from the back of the hearts so that about 3/4 of it is showing from the front.  (You a can either buy this readymade or you can pleat it yourself). Next adhere the tag at each end so that it forms a bridge over both the hearts and add the ‘Believe ‘sentiment.  Adhere the flowers and foliage, cutting the foliage up so that you can arrange them in a pleasing way and keeping 3x leaves to adhere to the sentiment with a fancy pearl in the centre.  Adhere some fancy pearls to the hearts as in picture. Turn the hearts over and adhere some twine on the back with a very strong adhesive so that you can hang the heart decoration. To finish add a little stickles glitter.


                                                          Get Well Card


Heartfelt creations Products Used:
HCDP1 228 Timeless Amour Paper Collection
HCPC 35 45 – Open Leaf pre cut set
HCPC 35 65 – Recovery Wishes pre cut set
HCPC 3500 – Open Vintage Floret pre cut set
HCD 3502 – Vintage Floret Die set
HCD  736 - Open Leaf die
HCD  737 - Ornate Gateway Die
Spellbinder Dies Used: Fanciful Lattice, Gold Magesty Circles
Other Items Used:
Dusky pink card stock, cream card stock, Deep olive green card stock, dusky pink satin ribbon, olive green organza ribbon, Distress inks – Tea Dye, Milled Lavender, Memento ink – plum, Versafine Ink – Sepia, flat pearls, stickles glitter – Diamond, either readymade fancy pins or make up your own, adhesive, Die Cutting Machine, 3D foam pads
Instructions:
Make your card base – 5 ½” x 7 ¾” from cream card and adhere some dusky pink card to the front.  Layer your chosen paper onto a cream matt and adhere to the card  leaving about a ½” dusky pink border. Stamp the sentiment onto some cream card and diecut out using the Gold Magesty Circles die. Die cut another Magesty circle in the dusky pink card. Cut this in half and layer them under the cream one so that it gives a shadow effect. Where the gap is, adhere some olive green organza ribbon. Die cut the Decorative arch. Distress the edges of these with both Tea Dye and Milled Lavender.   Die cut the large Fanciful Lattice card creator and cut to give you 2 borders and distress with the distress inks.  Weave ribbon into the borders between the lattice.  Adhere the borders to both the top and bottom of the card. Adhere the Decoratice Arch upside down so that the tip just touches the bottom border and it sits in the centre. Adhere the Magesty Circle matt using 3d foam pads so that it sits over the Decorative Arch as in picture.
Die cut a selection of the Vintage Floret flowers using the small, medium small and medium size dies.  Stamp the flowers with the co-coordinating stamps and distress with the distress inks. Die cut 3x open leaves and stamp with the coordinating stamp.  Die cut about 6 foliage flourishes in pink card stock. Make up a selection of the flowers and adhere to the top left hand side of the Magesty Circle (keep a small one for later) along with some leaves and foliage flourishes. (Cut some of the leaves and flourishes in to smaller pieces.  Make a bow and adhere to the bottom right along with a foliage flourish (cut in half) and the fancy pearl pins. Adhere a small flower to the centre.
Add some pearls to the centre of the flowers and along the Lattice borders.  To finish add a little stickles glitter.
Don't forget that I have my blog candy giveaway....you can find the link in my side bar:)
Happy Crafting everyone:) x


Monday 28 October 2013

Have A Super Day x

 Evening everyone x I hope you have all managed to keep safe in this stormy weather that we have had here in the UK x
My card today mainly consists of Spellbinder dies and lot's of layering. I have used Micro Beads on my patterned paper (a Sue Wilson technique) which adds some gorgeous texture to my card.


I have threaded some satin ribbon through the diamonds on the Fanciful Lattice


 I have made the flower from lace and organza ribbon and added a pearl in the centre
(I will be adding a tutorial for the flower later in the week)
 
Products Used:
  • 8"x8" Card base, brown and cream card stock.
  • Patterned paper - I have used Beach Bliss by Lily Of The Valley
  • Spellbinder Dies Used: Fanciful Lattice, Timeless Rectangles, Persian Accents and M-Bossabilities - Twisted Hearts Design B
  • Justrite Stamps and Die - Vintage Labels Four and Birthday Wishes For You
  • Cream vintage lace, cream organza ribbon
  • Creative Expressions - American Seam Binding, Micro Beads
  • Cosmic Shimmer Gilding Wax - Patina
  • Flat cream  pearls
  • Versafine Ink -Sepia
Instructions:
Cover your card base in brown card. Cut your patterned paper 7" square and cover with a piece of double sided adhesive sheet. Peel the top layer off and take your Micro Beads and cover it making sure that all areas are covered. Matt this onto a piece of cream card gilding both with gilding wax along each edge before adhering together. Adhere this to your card.
Die cut - The largest and smallest Fanciful Lattice onto cream card. A large Timeless Rectangle in brown card and the label from the Justrite Vintage Labels Four in brown card. Put the label through your die cutting machine using the embossing folder - Twisted Hearts, making sure you emboss with the Design B side.  Cut a matt in brown card to fit the large Fanciful Lattice. Add some gilding wax to all of these elements.  Weave the American Seam Binding through the large Fanciful Lattice.
Matt and layer these all on top of each other using 3D foam pads as in picture and adhere to the top halve of the card. Stamp the sentiment and die cut out with the small label from the Justrite die set and adhere with 3D foam pads to the centre.
Die cut out the border from the Persian Accents in brown card and add a little gilding wax.
Adhere a length of lace along the bottom of the card and adhere the border over the top.
Make a bow with the seam binding and adhere this to just above the top right hand side of the border.
Make the lace flower:
Either punch or cut a small circle from card about 3/4" diameter. Take a length of lace about 10" in length and using a hot glue gun adhere it around the circle just off from the edge, rushing or pleating as you go to form a circle. Do the same with the organza ribbon, this time started further in to the centre and again with the lace adhering from the centre. Adhere a pearl or button in the centre.
You can make these in all sizes, which is great if you have lots of oddments of lace to use.  I am in the process of doing a tutorial on my method which should be on my blog by the end of the week.
Add your lace flower to the centre of the bow. To finish off the card I have added some pearls to the border and around the Fanciful Lattice rectangles..

Don't forget that I have my Blog Candy Giveaway which you can find in my side bar x


Saturday 26 October 2013

Blog Candy Giveaway

Hello fellow bloggers.
 I would like to say a big thank you to each and everyone of for supporting me by becoming a follower on my blog and all the beautiful comments that you all leave me.....I love reading them and they all inspire me to keep on creating so as a big thank you from the bottom of my heart I have a blog candy give away!!! I would love you all to be in with a chance so all you have to do is be a follower of my blog and if you are not and you are new to my blog well that is ok too just leave me a comment and if I have inspired you then become a follow, however this is not mandatory as I really don't want you to feel that you have to ! Only if you like my creations:)
So that is all really:) Now I have quite a lot of stash so I thought to make it fair I will do a draw once a week over the next 4 weeks so you all will have 4 chances of winning! All the Giveaways will be slightly different, but all will include at least 1 die set, 1 stamp, ribbons, embellishments and some papers and/or a paper pad. Everyone is welcome to take part wherever in the world you are as long as you are a crafter of some kind:) x


I hope that soon I will be able to share my exciting news with you, but until then I hope I am continuing to inspire you:) x Also I would like to apologise for not being able to visit all of my blog friends as much as I used to, but I am super busy working and preparing for my .......... ok sorry can't tell you just yet, but I promise soon all be revealed:)  What I can tell you is that I am going to be adding lot's of new things to my blog over the next few weeks......Video tutorials being one:) Hope fully I will also be adding these to You Tube, So keep an eye out:) x
Also I am pleased to announce that I am now a Free Lance Demonstrator so if anyone would like me to visit there local shop or you are a shop owner and would like me to Demonstrate then email me at nikki@sepad.co.uk
That's all from me until tomorrow when I will be back with a card to share with you all !
Thank you all again,
Crafting Hugs xxxxx


Friday 25 October 2013

Hobby House DT Inspiration

Happy Friday everyone. I hope you are all having a good day:) x
Today it is my turn to inspire you all with those gorgeous Hobby House products.
I have used a Topper by Mo Manning on my card today. You can find a full product list over on the Hobby House blog HERE .

  • The papers that I have used are Maja Designs -It's Christmas Time and Vintage Spring Basics
  • The frame around my image is Spellbinder - Decorative Labels Eight
  • All the gorgeous embellishments are all The Hobby House products.

Thursday 24 October 2013

Autumn Leaves

Good morning everyone. I hope you are all well x
Over the last few weeks I have seen lot's of autumnal themed cards and projects around blogland which have inspired me to make an autumnal card myself. Now for those of you that know my style you will know that I rarely make a card either using inking techniques or oranges and brown but lately I have not only become rather fond of these autumnal colours I have also been inspired by my teamie over on Heartfelt Creations Kathy Wright Clement who recently shared on her blog some tags that she had made whilst doing a Tim Holtz online course - Creative Chemistry 102. Now I have over the years seen lots of different techniques using Tim's products and I myself have many a shelve packed full of most of the products, but I have never really found the time to just have a play. So I thought I would enrol in the course Creative Chemistry 101 (I very much recommend it). So today I would like to share a card that I have made using the Nostalgic Batik Technique.....well my take on it anyway:) I am thinking a little more practice is needed:)


To create the flowers I have used some burlap which I treated with a PVA and water mix to stop them fraying and then die cut them and used a little distress ink on them.  I did the same with the leaves. The rose leaves are made using brown paper and Mica Powder.
 
I used Walnut Stain and clear embossing powder for the tree which is a Creative Expressions stamp
 
 I made the bow with brown burlap, organza ribbon and some cream jute which I have inked a little 
 
 
Products that I used:
  • Cream, brown and light beige and dark beige creamy card stock
  • 8" x8" card base
  • Spellbinder Embossing folder - Flora design B, Rose Creations die and Branching Out die
  • Heartfelt Creations - Open Leaf stamp and die set, Falling Leaves die set
  • Distress Inks - Walnut Stain, Shabby Shutters, Fired Brick, Victorian Velvet, Tattered Rose, Bundled Sage, Forest Moss, Milled Lavender, Tea Dye, Broken China and Squeezed Lemonade
  • Cosmic Shimmer - Mica Pigments - Dark Bronze, Copper, Red Bronze, Polished Silk Glitter - Penny Copper, Clear embossing powder and PVA glue
  • Flat pearls, decorative pearl brad or button, pearls on string, embossing ink
  •  Creative Expressions - Stamp collections - Falling Leaves and Fancy Foliage, Gilding Wax - Golden Light, Jute
A quick run down on how I made my card:
  • First I created my topper using the Nostalgic Batik Technique -  First you ink and heat emboss the tree. You then create you background to how you want it to look using distress inks. Stamp the leaves with  embossing ink and go over it with your Mica Pigments with a brush. You then wipe off any excess. It doesn't stick to the tree as you have embossed it.
  • Decorate a piece of light beige card using the leaf stamps. Use embossing ink and the micas to create a background. Adhere this to the front of your card.
  • Take a sheet of card in a beige cream and emboss with the  Flora design folder, you will need to do this a few times.  Go over the embossed area with the gilding wax. Cut 2 x 2" strips and 1 x1" strip all 7" in length. Decorate the edges with the glitter using the Cosmic Shimmer glue. Once these are dry layer them onto your base card with 3D foam tape as in picture. Next adhere your main tree image about a 1/2" from the top in the centre.
  • Prepare the burlap and let it dry. Once it has dried die cut enough flowers to make 3 main ones and one single small one. Die cut about 10x leaves in burlap and 4x Open Leaves. Adhere them to the top right hand corner in a crescent cluster. Keeping one small flower and a few leaves to one side.
  • Make up the bow and adhere this to the bottom left of your design.
  • Die cut the tag from the Branching Out die set in brown. Layer a piece of beige card onto it and Glitter the edges. Stamp the sentiment onto cream card, and ink to co-ordinate with the card.(Add glitter to the edges).
  • Adhere the small flower that you have left with a few small leaves to the bottom left of the sentiment.
  • Adhere some jute to the edges of the main image layer as in picture using the Cosmic Shimmer glue.
  • To finish add a length of pearls on string to the bottom of the 2 outer embossed strips and also some jute. Finally add pearls to the centre of the flowers and some tiny pearls to the tree.
Ok, so I know it isn't perfect but I am really liking this effect...... I am thinking I will attempt another one very soon:) x


Wednesday 23 October 2013

Beautiful Memories - Heartfelt Creations

Happy Wednesday everyone x
It is that time of the week again when I share my Heartfelt Creations project with you.
Be sure to head on over to the Heartfelt Creations blog to see an array of totally stunning projects from the other Heartfelt Creations Design Team members. It is coming to the end of our term and we are all on tender hooks awaiting to here if we will be on the team for another 6 month term.....fingers crossed:) x
For my project this week I have used numerous collections as well as the new Sweet Juliet flower die and Antiquity Papers......I just love the vintage style of this collection:)
I have lot's of pictures to share with you as there are 10 pages to my book. I haven't done an in depth tutorial for each page as it would take forever, however I have given you a full list of products that I have used and of course you can arrange your elements as you wish.

 This is the front cover of the memory book:


This is the inside cover: I have made a pocket to add those extra photos or memorabilia


Heartfelt Creations Products Used:
HCDP1 237 - Antiquity Paper Collection
HCD 740 - Sweet Juliet Die
HCDP1 228 - Timeless Amour Paper Collection
HCD 729 - Decorative Blossom Corner
HCD 727 -  Vintage Floret
HCD 717 -  Layered Scalloped Posy
HCD 728 -  Timeless Amour
HCD 725 -  Decorative Metal Fixtures
HCD  735 - Gift Ensemble die set
HCPC  3563 -  Post Card pre cut set
HCPC 3564 - Blessing To Me pre cut set
HCPC 3500 - Open Vintage Floret pre cut set
HCPC 3502 -  Mini Vintage Floret  pre cut set

Spellbinder Products used:
Adorning Squares, Decorative Labels Twenty-Two, Labels Twenty-Two, Classic Ovals Large, Decorative Labels Eight
Other Products Used:
Deep plum and pale dusky pink ribbon, pearls, pearl brads, pearls on string, lace, Cosmic Shimmer- Glitter Jewels: White Ice, Distress Inks – Milled Lavender & Spun Sugar, Antique metal large charm, Cream Shrink Plastic, Stickles Glitter – Platinum, Adhesive, Pearl Swirls, Burgundy and cream card, Archival Ink – Plum, Memory book, cream shrink plastic
Instructions
Choose your chosen papers and adhere them to each side of your memory book pages.
Die cut all your elements that you think you may need to begin with, you can always add a few more if you need them.  Make up the flowers, again you may need more, but it is easier if you have a few to start with.
For the front cover I have added my elements and also used a large vintage metal charm as a centre piece. I have decorated the flowers and some of the other die cut elements with some Cosmic Shimmer Glitter Jewels. The tag that I have made is shrink plastic. I stamped the sentiment onto the shrink plastic, made a hole using a hole punch and then heated it with a heat tool which then shrinks it.  On the inside cover page I have made a pocket so that the you can keep extra photos or other memorabilia in.
On the pages that you choose a lighter coloured paper distress the edges with Milled Lavender.
Create each page as to your liking, using some of the card panels from the Antiquity paper collection, also some sentiments and sayings from both the Antiquity and Timeless Amour paper collections. Use Opulent Ovals, Decorative Labels Twenty-Two, Decorative Labels Eight or some other decorative die that you prefer for the backgrounds for your photos. Add the flowers, ribbon, lace and pearls to decorate each page.
To finish off the Memory book add some glitter to the edges of some of the elements and edges of the pages and add some ribbon and lace to the rings of the book.
Don’t forget if you want to see more photo’s of my memory book you can find them on my blog


Tuesday 22 October 2013

Thank You Tag Card

Afternoon all x  Just a quickie post today as I am baby sitting my grandson and posting this whilst he is having a little sleepy:) x
Today I have a tag card to share with you all:


 I have made a pocket with the Decorative Labels Twenty-Eight die
 
 
   I have stamped the Tattered Collage, coloured it in, distressed the edges with Milled Lavender and Bundled Sage. I have then  die cut it out using the Decorative Labels Twenty Eight and layered it onto the largest die cut out in pink card
 
  
I decided to put my sentiment on the back of the tag as I didn't want to spoil the image on the front of the tag

Products that I Have Used:
  • Patterned paper - Maja Designs, pink card stock and a 7"x7" white card blank.
  • Spellbinder dies used: - Decorative Labels Twenty-Eight and Labels Twenty, Vintage Lace Accents.
  • Heartfelt Creations - Vintage Floret die set and co-ordinating Vintage Floret stamps, Tattered Collage pre cut stamp and the Gift Ensemble die set (foliage swirl).
  • Justrite Stamp - Thank you Labels Twenty.
  • Other products used: Memento ink - Plum, Distress Inks - Milled Lavender, Bundled Sage, Distress Markers - Spun Sugar, Aged Mahogany, Victorian Velvet, Shabby Shutters and Frayed Burlap.  plum ribbon, pale pink organza ribbon, vintage metal charm, Cosmic Shimmer - Vintage Golden embossing powder, Glitter Jewels - White Ice, ivory flat pearls, fancy pearl button and Want2Scrap Nestabling.

Monday 21 October 2013

No pastels today!

Good morning everyone x I hope you had a wonderful weekend:)
My card that I am sharing with you on this rather dull Monday morning here in Cambridgeshire is similar to one that I demonstrated on Saturday (I will post that card at a later date).
I wanted to have a play with some new Creative Expressions Gilding Wax and I just fell in love with this purple one so I decided to go with purple and black for this creation.


Products that I have Used:
  •  Black 7"x7" card black, Purple card, gold shimmer card, and black card.
  • Spellbinder dies Used: Fanciful Lattice, Diamond Effects, Rose Creation and Jewel Flowers and Flourishes.
  • Cosmic Shimmer: Metallic Gilding Wax- Vintage Purple, Polished Silk Glitter - Light Purple and Golden Sand, Clear embossing powder.
  • Creative Expressions: Stamp - Victorian Collage, Heart Lattice Embossing Folder chosen by Sue Wilson, Pearls and Black Swirl pearls
  • Archival Jet Black Ink, Perfect Medium embossing ink, Fancy button, Vintage metal corners, vintage metal clock embellishment and purple ribbon.
Instructions:
  • Start off with a 7"x7" black card blank. Choose some of the black patterned paper from the Creative Expressions Teresa Collins paper pad and cut this 6 1/2" square.
  • Using the Sue Wilson embossing folder - Heart Lattice and take it through your embossing machine using the black patterned paper. This gives your paper just a little texture. Take the gilding wax -Vintage Plum and gently rubbed over the paper with your finger. Just love this effect when using it on patterned paper:). Adhere this onto the card base.
  • Die cut the Diamond Effects die out of black card.Stamp the Victorian Collage stamp on to gold shimmer card using black Archival ink and cut it out to fit inside the Diamond Effect frame. Layer this onto some purple card so that the purple shows through the diamonds. Adhere this to the top left corner of the patterned paper at an angle using foam pads. Use a little more gilding wax over the black on the frame.
  • Die cut enough flowers from the Rose Creation die set in purple card and make up 4 flowers as in picture. Die cut and emboss some leaves (6) in the gold shimmer card and the flourishes in black card from the Jewel Flowers and Flourishes die set. Use some more gilding wax on the leaves. Adhere 3 of the flowers, flourishes and some 4 leaves on to  the top right hand corner.
  • Die cut and emboss another Diamond Effects frame and cut off a longer length of it to create a border overlaying over purple card. Adhere this with foam pads towards the bottom of the card.
  • Make an oversized bow in purple ribbon and adhere this to the left hand side of the border, adding the other flower and leaves to the centre. Take the vintage embellishment metal clock and add this too.
  • Stamp the sentiment and heat emboss with clear embossing powder onto black card and die cut using the tag from the Fanciful Lattice die set. Adhere this with foam pads on the right hand side of the border.
  • Add some gilding wax to the 4 antique vintage metal corners and adhere these to the frame.
  • Embellish the card with a pearl swirl and some ivory flat pearls. Add a fancy button to the centre of the large flower.
  • Finish by adding the purple and gold glitter. You may find it easier to add the glitter as you make up the elements and before you add them to you card.

Friday 18 October 2013

Friendship

Happy Friday everyone:) I hope you are all well x
Before I share my card with you I just wanted to let you all know that I will demonstrating again at Sir Stampalot in Peterborough tomorrow from 10am until 4pm.
Todays card is similar to one that I will be demonstrating.


Products that I have Used:
7"x7" card blank
Maja Designs paper - Vintage Summer Basics
Heartfelt Creations - Timeless Amour die set
Spellbinder - Opulent Ovals and Labels Thirteen,Vintage Lace Accents, Rose Creations and Carnation Creations
Justrite Cling Stamps - Vintage Oval Labels
Stickles Glitter - Diamond
Cosmic Shimmer - Glitter Jewels: Diamond Sprinkles
Creative Expressions - Star Swirls
Fancy pearl buttons, lace, organza ribbon, pearls on string, pale pink card stock, Versa Magic chalk ink - pink Petunia and Versafine ink - Vintage Sepia

Instructions
  • Cover your card blank in pale pink card.
  • Cut some chosen paper 61/4" square and adhere to the card.
  • Die Cut: The largest die from the Opulent Oval in pale pink card and the Decorative Heart from the Timeless Amour die set in patterned green paper from the Maja Designs papers  and put these to one side.
  • Stamp the large decorative oval from the Vintage Oval Labels stamp set onto some patterned green paper from the Maja Designs papers and also stamp the sentiment in the centre. Die cut this out using the Labels Thirteen.
  • Adhere the Decorative Ornaments front facing from on the back of the Opulent Oval: One at the top and one at the bottom with about 3/4" showing. Adhere to the card towards the top and just of centre to the right of the card using foam pads to add some dimension. Take the Labels Thirteen and adhere this again with foam pads onto the Opulent Oval so that it sits central.
  • Die cut enough flowers from the Carnation and Rose Creations die sets to make 1x large rose and 1x large carnation. Make 1x small Rose. Die cut 2x large and 2x small rose leaves and 3x carnation leaves.
  • Make a lace double tail and an pink organza tail and adhere these to the top left of the Opulent Oval  along with one of the large flowers and 2 rose leaves that you made. Adhere the Decorative Heart and the other 2 flowers and foliage at the bottom right of the Opulent Oval.
  • Adhere a length of pink organza ribbon and lace along the bottom of the card. Add the pearls on string where the ribbon and lace meet. Make a double pink organza bow and a smaller single lace bow adhering the lace one on top of the organza one. Adhere the bow at the right hand side of the ribbon and lace border.
  • Cut 2x small pearl swirls from the Pearl Star Swirls and adhere at the bottom and top of the top Rose. Adhere some of the pearls from the Star Swirls to the Carnation Leaves.
  • Add a decorative pearl button to the centre of the carnation and to the bow. Adhere 3x small pearls to the top right hand side of the card.
  • Finish of the card by adding Stickles glitter - Diamond and also some Cosmic Shimmer Diamond Sprinkles glitter to the card.


Thursday 17 October 2013

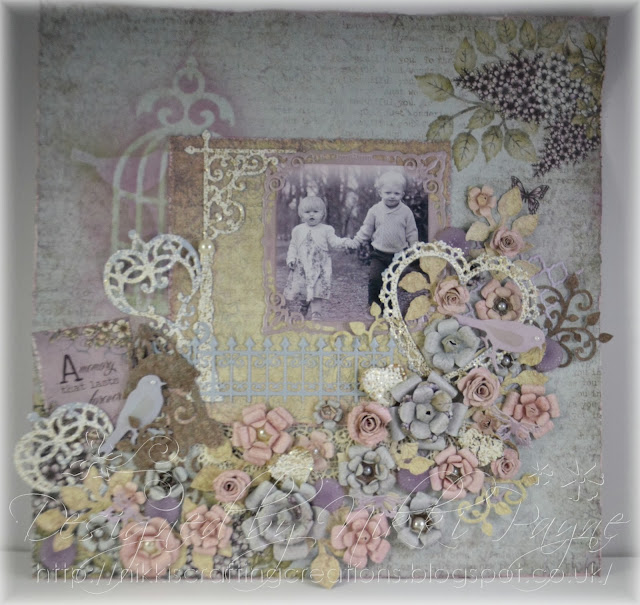
Memories That Last Forever

Afternoon to you all. I hope you are all enjoying your day x
I wanted to share a scrapbook layout with you today.


Items I have Used: 
Heartfelt Creations Products: Posy Patch paper collection, Decorative Metal Fixture die set, Timeless Amour die set, Posy Patch die set, Open Leaf die set, Gift Ensemble die set.
Spellbinder products used: Jewel Flower and Flourishes, Bird Sanctuary, Bitty Blossoms, Adorning Squares. 
Other products used: Distress ink - Milled Lavender and Bundled Sage, Cosmic Shimmer - Vintage Golden White embossing powder, Pearls, Creative Expressions Dazzlers - Lavender, That Special Touch Bird Cage and Bird mask, Cosmic Shimmer Vintage Mist - Antique Rose, pale blue and lilac card stock.
 
A quick run down on how I have created my layout:
  • Choose your paper and distress the edges using a Tim Holtz distressing tool or something similar and ink with Milled Lavender Distress Ink. Using the Vintage Mist and Bundled Sage distress ink mask over the Bird Cage and Bird mask towards the top left of your paper.
  • Cut a piece of co-ordinating paper 6" square and again distress the edges and ink. and adhere to your main layout. (Die cut the Fancy Lattice and adhere just underneath the square panel at an angle)
  • Die cut the largest square from the Adorning Squares die set in pale lilac card and cut your photo so that it sits just in side. Use a little Milled Lavender around the edges of your photo. Adhere these to the main paper.
  • Add 2 strips of lace to the bottom of the square panel.
  •  Die cut:
  • The post, hanger and decorative ornament from the Decorative Metal Fixtures die set, the decorative lace heart from the Timeless Amour die set, 2x birds ant the small bird cage from the Bird Sanctuary die set, 3x small butterflies from the Jewel Flowers and Flourishes die set, Wrought Iron gate from the Die D-Lites die set, about 8x leaves from the Heartfelt Creations Open Leaf die set, about 3x or 4x flourish leaves from the Heartfelt Creations Gift Ensemble die set and an assortment of flowers from the Bitty Blossoms die set and Heartfelt Creations Posy Patch.
  • Heat emboss the post and hanger, decorative heart, decorative ornaments and 3x cork hearts using Cosmic Shimmer Vintage Golden White embossing powder.
  • Cut out a sentiment from the Heartfelt Creations Posy Patch Collection papers and distress and ink the edges.
  • Make up your flowers as you require them to sit on your page - I made 2x lge, 7x med, and about 6x small ones from the Posy dies and 3x small and 2 medium from the Bitty Blossom die set. Spritz the flowers with the Vintage Mist.
  • You are now ready to adhere all of your elements in place.
  • Finally add the Dazzlers and pearls to your layout.


Wednesday 16 October 2013

Sweet Juliet

Happy Wednesday everyone x I hope you are all well:) x
Today it is again time for me to share my Heartfelt Creations projects with you all.
I have used the new flower dies called Sweet Juliet which you can use to create dimensional flowers with. For lots more inspiration from the other very talented Design Team members and more details on the new collection of stamps, papers and dies hop on over to the Heartfelt Creations blog HERE.

My fist card has an autumnal feel about it. The papers are from the new Antiquity paper collection and I have made the flower using the new Sweet Juliet flower die and Vintage Floret Die and co-ordinating stamps.


My 2nd card that I would like to share with you today is again using the new Sweet Juliet stamps and die, however this card is a little softer in colour with lilacs and sage green.


 You can find a full list of products and full instructions on how I have created my cards over on the Heartfelt Creations Blog HERE