Friday 28 June 2013

Fussy and Fancy DT card.....Steampunk

Happy Friday everyone:) Yes another week has come to an end......I am feeling Christmas is creeping upon us very quickly!!! Doesn't help with the fact that summer seems to have forgotten us:(
So today I am here with a card that I have made for the new challenge over at Fussy and Fancy Friday challenge...the theme is 'Steampunk' hosted by the lovely Laila.  This is another card that I thought eeeeks how am I going to achieve this steampunk theme, but still within my style of loving lace pearls and bling?...Well after hoping around blogland I soon realised that there are lot's of ways that you can interpret this steampunk theme....and this is what I created:


  •  The image is Lacy Sunshine: Rosalind and I have coloured her in with copics.
  • The papers are Prima -Engraver as is the large flower in the right hand corner.
  • The cogs are Tim Holtz.
  • I have used frantage on the metal corner.
  • The blue background cogs are Spellbinder dies.
  • The blue roses and pink voile are from Live and Love crafts.
  • The small pearls and beige roses are from The Hobby House.
  • All of the other bits are from my crafty stash.

I would like to enter my card into the following challenges:
Crafty cardmakers - steampunk
Sparkles forum challenge - steampunk or vintage


Thursday 27 June 2013

In The PInk DT challenge card

Hope you are all well on this very sunny Thursday morning:)  It's another new challenge over at In The Pink.....the theme this week is 'pink' with wings ....so as long as it is predominately pink and has something on it with wings (bird, butterfly fairy ....you get the drift!) then hop on over  and take part in our challenge:).
My card is a Mo Manning topper available from The Hobby House called Cupcake Girls:

  • The pearls, brads, roses, lace, and butterfly charm are all from The Hobby House.
  • I have intertwined the pearl flourish in and over the cluster of flowers...which I am really liking:).
  • The corners are metal corners and flower buds are both from Live and Love crafts
  • The butterflies are from the Spellbinder die set called jewel flowers and flourishes and the circle die is grand decorative circles.
  • The sentiment and ribbon is from my stash.
  • The papers are Wild Rose Studio - Annabell's Meadow
I would like to enter my card into the following challenges:
Crafting By Design - anything goes
Creative Moments - Flowers
Divas By Design - Pearls
Ruby's Rainbow - things with wings
365 cards challenge - word Wednesday: Beautiful


  • 

Wednesday 26 June 2013

Heartfelt Creations Wednesday

Hi fellow bloggers! So by now you will all have guessed that Wednesday will see my Heartfelt Creations project. Today I have a gift box and notelet collection to share with you as over at Heartfelt Creations  Today we are doing a cross promotion with Scor Pal. Please visit the Heartfelt Creation blog at www.heartfeltcreations.us/blog and the Scor Pal blog at http://scor-pal.blogspot.com/. Prepare to be blown away with all the amazing project featuring the Scor Pal and Heartfelt Creations products.
 
'Birthday Wishes' Notelet gift set

 This shows the gift card inside the box and the top of the box behind

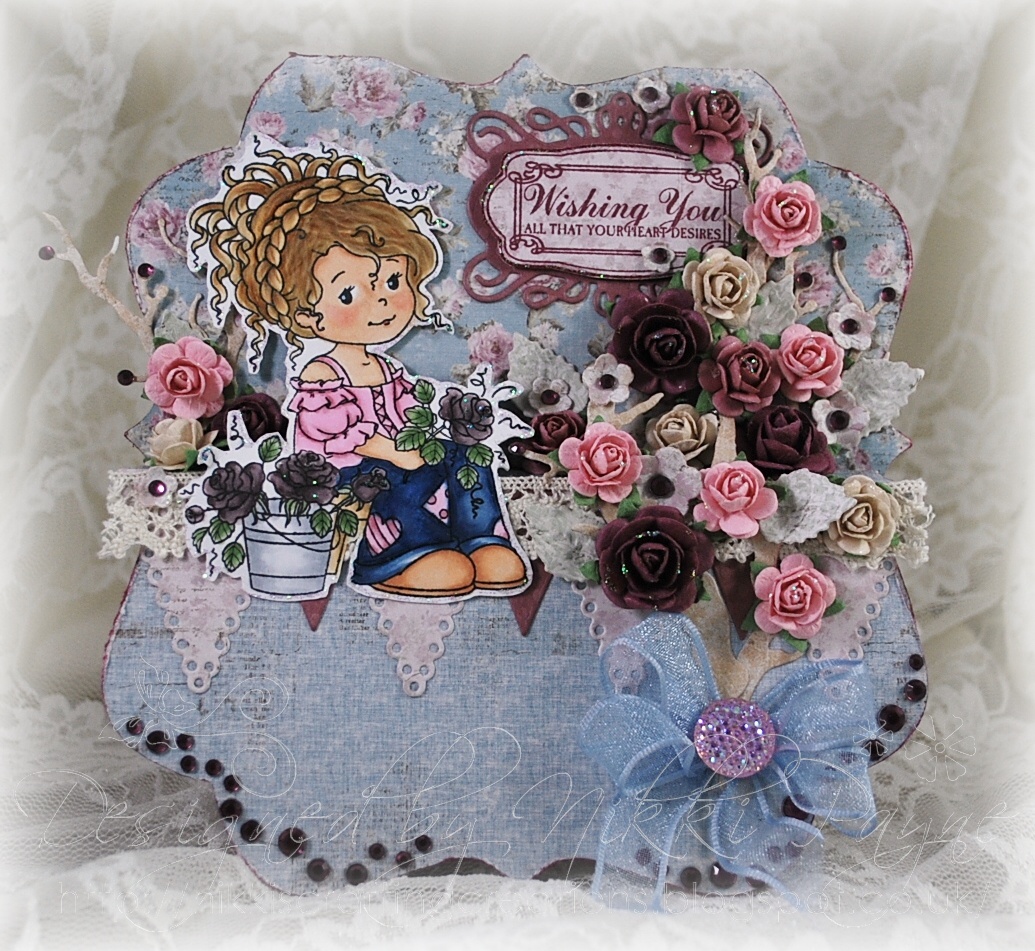
 In this picture is the front of the gift card


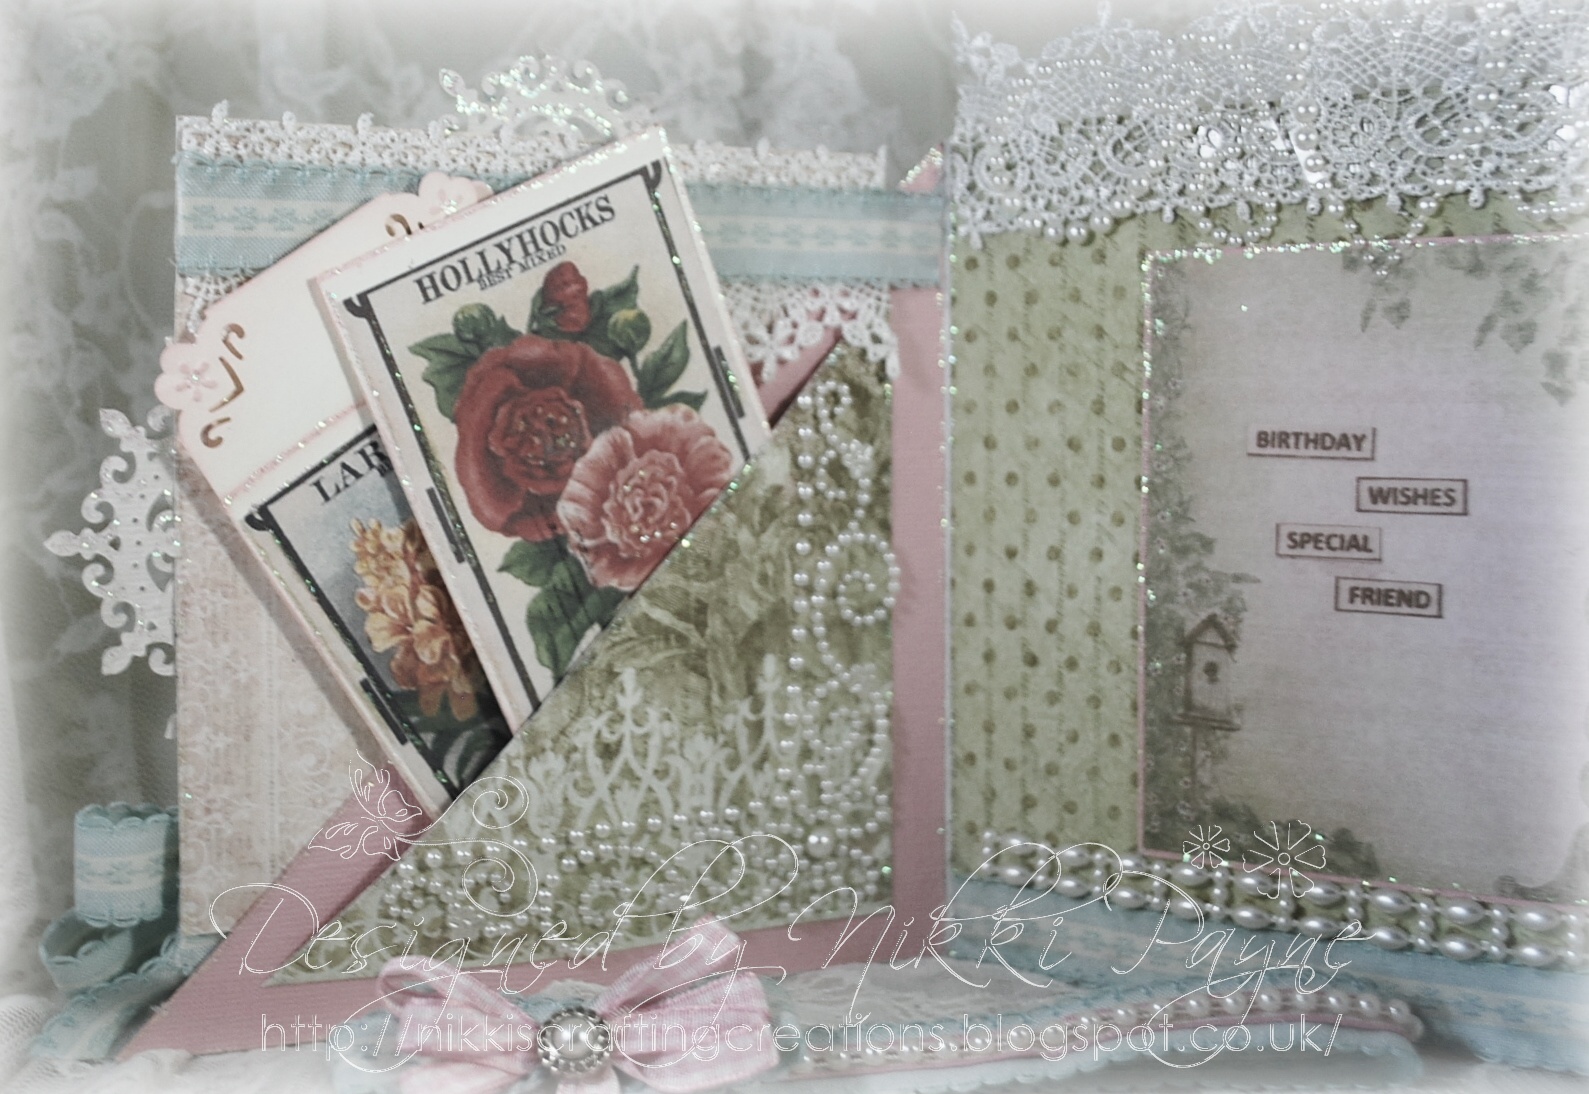
 This is the gift card open showing the pockets holding the notelets and envelopes
 
These are the notelets and envelopes. The pink envelope with the acetate aperture contains sentiments from the sentiment stamp so that the recipient can put there own sentiment onto the notelets when they need them

A close up of the notelets
 
This picture is the back of the right side of the card
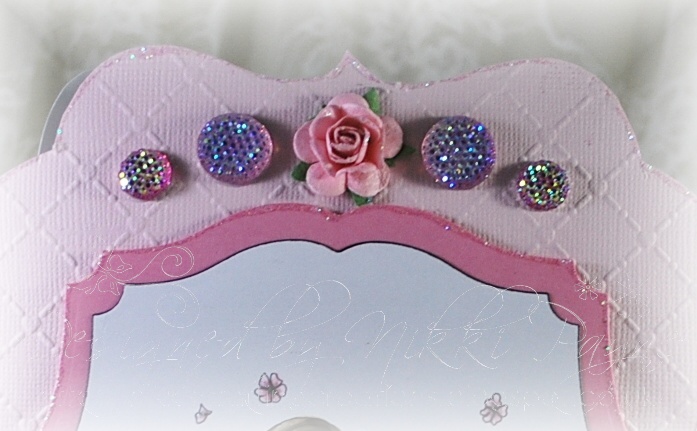
 

The card and box


A close up of the box and card showing the pearl detail on the box lid
 
Instructions and items I used for this project:

Heartfelt Creation projects Used:

HCPC 3533  - Sunkissed Fleur pre cut stamp set

HCD    -Sunkissed Fleur Die set

HCPC  3544 -All Seasons Sentiments pre cut stamp set

HCPC 3535 – Sunkissed Tags and Basket pre cut stamp set

HCPC 3494 – Delicate Asters Pre cut stamp set

HCD 713 – Decorative Lace border die set

HCD  737 - Ornate gateway die set

HCDP 1234 – Daphne Papers

Spellbinder die – Floral Doily Accent die


Other Items Used:

Pink and cream card stock, pearls, ribbon,  lace, pink embossing powder, embossing ink, Score-pal, score tape and glue.


Instructions

Card and small note cards:

Take a piece of 12x12inch pink card and cut in half. Score at 2 ½”, 3”, 9” and 9 ½”. Take the other piece of card and cut in half. Adhere one piece to the front of the card and the other to the back. This is your base card.  Adhere chosen Daphne papers to all inside panels, the front and the back side panel of the card.  Make 2 pockets for each side panel.  Make a ¾” in debth x about 4 3/4” pocket using your score pal board. Die cut 4 decorative lace borders and 4 floral doily borders and adhere as in picture. Stamp and heat emboss x 2 sunkissed fleur die sets and die cut them out. Stamp and heat emboss Sunkissed 2x tags from the tags and basket set and fussy cut them out. Stamp and heat emboss 5 x foliage from the delicate aster stamp set and die cut them out. Die cut 3 ornate arches from the ornate gateway die set. Now adhere these to your card as in picture. Stamp and cut out the all seasons sentiments. Adhere a chosen sentiment to the front tag and the tag on the outside of the back of the card. Add lace, pearl sand ribbon to finish.

 Make 6 small cards measuring 3 1/4”x 4” using your scorpal board and decorate with the panels from your Daphne paper collection. Make envelopes measuring 3 ½” x 4 ¼” decorate with lace and the floral doily borders that are left over from the ones that you used for the main card and cut the decorative stamps from the Daphne paper collection and adhere to the fronts.  (For the instructions on how to make the envelopes please visit my blog). I have also made an envelope with an acetate front containing all of the sentiments that I haven’t used, which I have cut and adhered score tape too. This is so that the recipient can use the ones that they require for the particular occasion,  they can then adhere these onto the small cards.

Make a box measuring 6 ½” x 6 ½” from pink card. Adhere some Daphne paper and decorate with 4 x floral doily borders, 1 x decorative lace border (the scalloped part), 1 x decorative arch and 1 x set of stamped embossed sunkissed fleur flowers. Adhere these to the box as in picture and add lace, ribbon, pearls and decorative pearls to finish.


Mini tutorial on how to make the envelopes
 
 
For the envelopes you will need paper measuring 4 1/2" x 9"
Score at 4 1/4" and 8 1/2"   length ways and 1/2" and 4" width ways

 
Cut along the score line as in photo to leave tabs in the centre and a flap at the top.
Add score tape to the centre tapes


For the envelope which the sentiments go in cut an aperture out of the centre with your chosen die as in picture.
 
 Adhere acetate on the inside of the envelope with score tape

Here is what your envelope should look like
 
 
A quick how to make the box

For sizing of your box to fit your project/card visit the score-pal blog, where you will also find lot's of inspiring ideas and a full tutorial.

This picture shows my score lines and where to cut to create the tabs

 I have cut a small triangle out which then fits snug when Adhering together to create your box


Tuesday 25 June 2013

New Lacy Sunshine Stamps...... World of Oz

This is just a quick post this evening! But wanted to let all of you Lacy Sunshine fan's that over on the Lacy Sunshine Blog Heather Valentin has just released a New collection.... OZ!
They are available now! Hop on over to see the fantastic video showcasing all of the creations that the design team members have created.......Here's my creation using Eleanor - Dorothy


Isn't she gorgeous!!! I have coloured in with copics.  I have gone for totally different colours to what I normally go for and to my surprise I am really liking them:). The background of the door hanger has been first painted with  acrylics. I have then used grunge paste and stencilled using a stencil that came free with a magazine. The paper at the bottom of the hanger is Prima: Lady Bird Collection. I have blended the paper in using a little grunge paint and acrylics. I have cut the image out with Go Kreate die: frilly #10 and distressed at the edges with bundled sage. The paper flowers and flourish are Spellbinder: jewel flowers and flourishes. I have used my copics to add a little yellow to the flowers. The stamp I have used for the letters is Artemio.....new to me, but I like the font!...The pearls lace and tiny roses are from The Hobby House.

I would like to enter my door hanger into the following challenges:
Craft Your Passion: In the garden
House of Gilli: bright colours
The Crazy Challenge: anything but a card
Love To Create #47: colour inspiration
Red Carpet Studio: Digital image
Sister Act Card Challenge: anything goes


Monday 24 June 2013

Lacy Sunshine....News

Good morning everyone! Do you ever get up in the morning wondering whether or not you have actually been to bed:( Well I am having one of those mornings.....I have had a very fun filled weekend and was working on the card I have to share with you today until 12 o'clock last night. I then got woke up by a knock at the door (mr postie bringing me some crafty goodies, so not complaining) ....and thought who on earth is knocking this time of night LOL! Then remembered that I had a conversation with hubby at 5.30 this morning and my son at 7am so what happened to my sleep I don't know!!!! and I also feel like I have a massive hangover:( So anyways not a good start!!!! for a Monday morning...but have taken some tablets and had a strong coffee and now feeling good to go!!!...which is good as I am busy! busy!

Well! now that I have that off my chest I will tell you all my exciting NEWS...I am now a SUNSHINE GIRL!!!!!...

I was asked a few weeks ago by the very talented artist/designer of Lacy Sunshine Stamps  Heather Valentin if would like to join the design team and this was one that I was not going to turn down:) I have been using her images for a good few months now and I adore them!!!! So you will be seeing lot's more of these gorgeous images popping up on my blog:)
For my first DT card the image is Sticky Wings.... Bubbles Ice Skating. I have coloured her with copics and although she is not necessarily a Christmas digi.....well you don't have to skate just at Christmas! I decided I would make my first Christmas Card of 2013 with her! I haven't gone with the traditional colours with this one I thought I would go with pale pinks, blues and green.

So here she is my debut card on the Lacy Sunshine Design Team:  The challenge over on The Lacy Sunshine blog is as always 'Anything Goes'....So get creating and hop on over to the challenge blog and join in the fun:) and also check out the gorgeous cards that the other Sunshine Girls have created!!!


What do you think?..... I have to say I was really nervous on this one, but thought hey just go with what you know best! Bling, pearls and of course lot's of glitter and of course the frantage has made another appearance! I just love Christmas!
Also just to let you know...There are some adorable new images available on the website all created and designed by the extremely talented Heather Valentin.....  Check them out HERE
  • I have used Go Kreate Xl frames frilly #10
  • Papers is from Prima: Jack & Jill. blue and pink card stock.
  • The flowers, lace, pearls and gems are from The Hobby House.
  • The snow flakes are punches.
  • The corners are Melissa Frances available from Live and Love Crafts.
  • The die cut arch is from the Heartfelt Creations new Collection....Ornate gateway die.
  • The sentiment is a Papermania stamp.
  • The frontage that I have used is aged aqua available from Live and Love Crafts
  • I have also used a Stampendous frontage embossing tinsel in vintage blue which I purchased from Sir Stampalot
I would like to enter my card into the following challenges:
613 Avenue - anything goes
Challenges 4 everyone - always anything goes
Crafty Friends - use a charm


Sunday 23 June 2013

Something a little different for me....'Keep It Clean' DT card for Crafting When We Can challenge

Morning bloggers :) I hope you are all well and enjoying your weekend! I had a brilliant day yesterday....I went with my crafting friend Vicky (Vicky has been crafting for over 10years, but has only just started blogging...have a look at her blog...she is very talented!!) to The Hobby House Birthday Bash!!! I met some of my Teamies:) how fun was that!!!! We all had a great time chatting of course about craft:)...It was so nice to meet lot's of new ladies and we all have crafting in common! I now know that I am not the only one totally passionate and addicted to this craft:) The lovely Chris and Hazel were there demonstrating the gorgeous Hobby House products (photo's over on the Blog, but please don't laugh at my photo, I always seem to look drunk....however in my defence I had been up since 4 in the morning)) and we all had scummy lunch in The Hobby House café!  It was also sooooo nice to meet again the very lovely Jill....owner of The Hobby House......and of course without her I wouldn't be on this fab team...So thank you so much Jill for not only giving us these beautiful products to work with, but also for having me on your amazing talented design team...it is an honour!!!! x Ohhhh and just one more thing .......how amazing it was to see all of the design team cards on display in the shop:).....x

Well anyway I have a card to share with you today as it is a new challenge over at Crafting When We Can......... Keep It  Simple! and I know what you are all thinking...Nikki....keep it simple....I don't think so..heeee heeee:)! well I think I have done really well, maybe not totally 'keep it simple' (still a flower and of course some bling), but I think it still has a little of my style on it! after all that is what crafting is all about, isn't it.....crafting with our own unique style!!:) and I think I have managed to keep within the keep it simple theme!
The image is a gorgeous Lacy Sunshine digi by the very talented Heather Valentin.....who is generously sponsoring us this time! The digi is called Spring Blossom Flowers and I have coloured her in with copics.


  • The card base is a card from my stash...I think it is about 3years old lol.
  • I have used Go Kreate dies.... xl Frame:frilly#10 and layered the image onto a slightly darker pink card. For  the background of the main card I have layered pale pink card and embossed it using  a Creative Expressions folder called Heart Lattice....chosen by Sue Wilson.
  • The sentiment is a Heartfelt Creations stamp.
  • The rhinestone sparkles and flower are available from The Hobby House
So even if you don't usually do 'Keep It Simple' cards why not have a little fun and join in with The Crafting When We Can Challenge......If I can do it ...then anyone can!!!:)
So I hope you like my card and I would love to here what you think! I really enjoyed making this card... a little different for me:) x


Friday 21 June 2013

'Wee FLorist'....

Happy Friday fellow bloggers!.... The weekend is upon us again and I hope you have a good one:)
I am very excited as tomorrow I am off to Grimbsy to The Hobby House 10th birthday bash!!!!! yey:) and will be meeting some of my design team buddies which is going to be fun:) It would be nice to meet some fellow bloggers too so why not come along and see some demos and have a piece of cake...'I here they have a lovely tea room and the cakes are supposed be gorgeous'!!!

Today I have a card to share with you with.... eeeekkkk maybe to many flowers, but I couldn't resist:)
The stamp is a whimsy stamp....Wee Florist and I have coloured her in with copics.
The base of the card is from The Hobby House and I have used papers from Maja Design....Vintage Summer Basics and Vintage Summer Basics (the die cut leaves).


  • I have made a single shelve card and cut out the image and slightly bent it so that it appears to be sitting on the shelve.
  • I have used Spellbinder cherry blossom die to create a tree and added some of the blossom as well as some mulberry Roses.
  • The sentiment is Whimsy Stamp: Fanciful Birthday Notables1, which I have cut out by hand and adhered to Whimsy Stamp die: Elegant Notables 1.
  • I have used Whimsy stamp Banner Pennant Die Set. These Whimsy Design products are available from The Hobby House.
  • The gems, lace, flowers and rhinestone sparkle are also available from The Hobby House.
 
I would like o enter my card into the following challenges:
Crafty Ribbon: Flowers Galore
Cute Card Thursday - In The Summer Time
Deep Ocean Challenge - Welcome Summer


Wednesday 19 June 2013

Happy Heartfelt Creations Wednesday!

Happy Wednesday everyone...and what gorgeous weather we are having:).....I won't mention the forecast of 'thunderstorms'!
Today I have my DT Heartfelt Creations projects to share with you all..... I have a shelve card (loving theses at the moment) and a Flower seed gift card!:

Shelve Card


Heartfelt Creations Products Used:
Summer Season Stamp : HCPC 3541
All Seasons  Sentiments: HCPC 3544
Ornate Gateway Die: HCD 737
Sunkissed Tags and Basket Stamp: HCPC3535
Daphne Papers: HCDP234
Gift Ensemble Die: (foliage only) HCD 735

Other Items used:

Versafine ink – Vintage Sepia
Distress inks and Markers
Pearls on thread, scalloped pearls
Cream card stock

Instructions:
Make a shelve card: I have used a base card measuring 6.5x6.5inches. For the bottom shelve cut a piece of card 4”x5” – Score at ½” and

 1 1/2” – This has created a shelve. For the top shelve cut a piece of card 5”x4 1/2”- score at ½” and 1 ½”- This has now created a shelve and you are now ready to decorate.  Stamp and colour the image. Stamp the border and cut out.  Stamp the tag, colour the flowers in and cut out.  Die cut the Gates and arch out of cream card. Die cut 2x foliage. Cover the base card in with your chosen paper on the front and on the inside. Cover the shelves in chosen papers and adhere them in position .....so that when the card is open the shelves sit nicely (as in picture). Adhere the image onto the centre of the top shelve and adhere the gates either side and also adhere the arch to the top of the image. Cut the border to fit onto the bottom shelve in the centre and adhere the tag on top. Stamp the sentiments and cut the  ‘Especially For You’ words out – Ink the edges and adhere to the tag. Finally of course I have added pearls and a little glitter to finishJ.


I would like to enter my card into the following challenges:
Craft Room Challenge: here comes the summer
Lady Anne's  challenge: The Great Outdoors
Make it Monday: anything goes


Flower Seed Gift Card


Heartfelt Creations items used:
Spring Season Stamp: HCPC 3540
All Seasons Sentiments: HCPC 3544
Daphne Papers: HCDP1234
Ornate Gateway Die: HCD 737
Spellbinder dies: Decorative labels twenty two

 
Other Items used: cream and pink card stock, 2 different ribbons, lace, ornate pearls, flower soft, stickles glitter, distress inks and markers and a decorative punch.

Instructions:

Make the criss cross style card: Take 2 6”x6” card bases. Cut the fronts in half to create triangles. Adhere one card on top of the other- this has made your base card. Adhere your chosen papers to the fronts and also onto the inside of the cards. Stamp and colour the image. Die cut labels twenty two in pink card. Die cut 5 ornate arches in cream card. Take the image and layer up onto the labels twenty two. Adhere the ornate arches to the underneath as in picture and adhere to a patterned daphne paper size: 5”x5”. Adhere ribbon a long the front of the card and then adhere the layered image in the centre of the front of the card. On the inside of the front of the card cut a triangle allowing a ½” border and adhere to make a pocket. Make and adhere another triangle to the back inside of the card again creating a pocket. Cut a image from the papers and layer onto pink card leaving a small border as in picture. Stamp and cut out a chosen sentiment from the all seasons sentiment stamp and adhere in place as in picture. Add lace and ribbon to decorate the inside of card. Make a bow and adhere to the bottom right of the front of the card and add your chosen sentiment. Add a little flower soft to the spring season image. Adhere  pearls to both the inside and outside of the card. For the seed packet’s  I have made small envelopes measuring 31/2”x 21/2” and have printed the images from the internet.(You could stamp your images if you have the co-ordinating flower stamp to the seeds) I have decorated them with a little glitter and punched the corners of the sealing flaps with a decorative punch. You can then either place your seeds straight into the packets or you could keep them in the original packet and fold to fit into the ones that you have just made so that you still have the details and instructions for the seeds.

I hope you like my projects:)...To see lot's more gorgeous Heartfelt Creation projects that the other DT members have created hop over here at the blog and for all of the products that I have used visit the website here


Monday 17 June 2013

Spring Bringer - Gift Bag

Good morning fellow bloggers...I hope you all had a lovely weekend:)
Today I have a little gift bag to share with you......inspired by a lovey creation that Christine Emberson from Hope and Chance made:)...She is one talented lady!

But first a little news...

BIRTHDAY BASH

The Hobby House is 

10 Years Old

so they are having a

Celebration Demonstration Day

at the shop

Here are the details for the shop, if you would like to come and visit
The Hobby House Limited
Station Road
Tetney, Nr Grimsby
N.E. Lincolnshire
DN36 5HY

They have an excellent Coffee Shop on-site, the coffee shop is famous for its home cooking including fresh baked scones, Italian ice-cream and steak pie, hot lunches are served between 12 and 2p.m.
For travel details etc just hop on over to there blog HERE
 
So on to my gift bag:


I have used a white gift bag and cut it so that it doesn't show above the die. I have then used Go Kreate xl frames, frilly #10 - the medium one. To create the handle I have used the small/medium die from Spellbinders Labels Twenty.  The topper is Spring Bringer. The papers, pearls, flowers, lace, and ribbon are all from The Hobby House. For lot's more inspiration have a look at The Hobby House Blog: HERE
 
I would like to enter my gift bag into the following challenges:
Chocolate, coffee and cards: Bingo ( lace, ribbon and flowers)
Challenges for everyone #22 - anything goes
Sister Act challenge #11 - always anything goes
A Creative Romance -anything goes