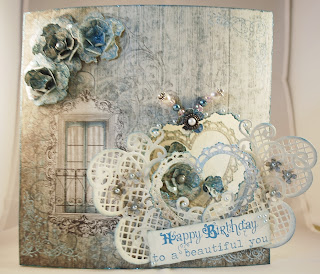
Ok! you may ask yourselves wow all 4 designs, well I made the mistake of still playing with my papers and dies after I had created my first 2 projects..... so I thought ok they did say I can submit more than 2 if I wish.... I had all 3 ready to post and the email ready to submit. But I wanted to decorate this heart that I had bought a few weeks ago and ohhhhh I shudn't have used my Heartfelt Creations stash..... cus when my friends and family all saw it they all said I should submit this and not one of the others, but how could I choose between them? well I couldn't and my friends and family were no help either as they all chose different projects too........ so there you have it .... a big lesson learnt when doing a DT call submission send them off as soon as one has finished them :)
Project 1
SO GRATEFUL FOR YOU –
SCRAPBOOK PAGE
(Project 1)
Papers Used:
·
Heartfelt creations Vintage Floret Collection 12
x 12 Papers
Heartfelt Creations Dies
used:
·
Vintage Floret (HCD 727)
·
Delicate Asters (HCD 726)
·
Decorative Window Scene (HCD 708)
·
Timeless Amour (HCD 708)
Heartfelt Creations Stamps used:
·
Burlap Background pre cut (HCPC 3515)
·
Mini Vintage Floret pre cut (HCPC 3502)
·
Open Vintage Floret pre cut (HCPC
3500)
·
Delicate Asters pre cut (HCPC 3494)
Other items and embellishments used:
·
Stickles glitter – diamond and milled lavender
·
Stampendous frantage encrusted jewel embossing
powders
·
Prima – say it with crystals
·
Approximately 20cm twine
·
Adirondak ink – Current, meadow
InstructionsDies needed:
· 2 x decorative windows ( from the decorative windows scene die set)
From the Timeless Amour die set:
· 1 x heart element/flourish
· 3 x trellis hearts
· 1 x small heart
From the Vintage Floret die set: (this is only a guide as it depends how you wish to layer your flowers
· 1 x large
· 2 x medium
· 2 x medium
· 2 x small/ medium
· 2 x small
· 2 x extra small
· 6 x foliage leaf from the delicate asters die set
· Make up and adhere the flowers together and leave to one side.
· Take your chosen paper and stamp the burlap image just above where you want the pictures to go, slightly at an angle.
· Stamp the edges of the paper using the burlap stamp (only about 2cm in)
· Heat emboss about ½ - ¾ cm around the edge using the embossing powders and also heat emboss the small enclosed heart .
· Using the sentiment paper from the paper pack, cut out the words that I have on the twine (or others if you prefer). Also cut out to other sentiments which you like. Ink around the edges.
· Take two photos and and cut them so that they fit inside the decorative window frames (cut off the window pane part of the window).
· Ink the edges of all the elements using the current coloured ink.
· Adhere all of the elements in position as in picture. ( Use 3d gel or foam pads to add a little dimension on some of them).
· Ink the twine a little if you wish and adhere the words onto it in position on your page.
·Add the crystals and stickles to finish
Project 2
Butterfly Heart - Card
(Project 2)
Paper used:
·Heartfelt Creations Vintage Floret Collection and cream card stock
·8 x 8 inches cream card blank
Paper used:
·Heartfelt Creations Vintage Floret Collection and cream card stock
·8 x 8 inches cream card blank
· Timeless Amour (HCD 728)
· Vintage Floret (HCD 727)
· April Release
· Layered Scalloped Posy (HCD 717)
Heartfelt Creations Stamps used:
- Open Vintage Floret (HCPC 3500)
- Mini Vintage Floret (HCPC 3502)
- Bold Vintage Background (HCPC 3504)
- Ryegrass Flourish (HCPC 3436)
· Small pearl brads, flat pearls and beads and
daisy head pins (if you make your own butterfly antennae’s)
· Stickles glitter – turquoise and diamond
· Distress inks – weathered wood and broken china
· Momento – Bahama blue
· Adirondak – cloudy blue
· Sparkly blue embossing powder
Instructions:
Dies needed:
·
Vintage Floret Flowers: 1 x medium/large, 5 x
medium, 2 x small/medium, 2 x small 8 x extra small (keep 1 for the butterfly
antennae)
This is only a guide as it depends how you wish to layer
your flowers up. I have used some patterned paper and some cream card to make
them.
·
6 x small blossom flowers ( from the layered
scalloped posy die set)
·
2 x decorative hearts ( keep 1 inner) (using your chosen paper)
·
2 x flourish dies from the April release dies
(in cream card)
· 1 x small enclosed heart and 1 x small trellis
heart
·
1 x plain sentiment box from the paper pad,
matching your main paper used on the card.
· Stamp the Vintage floret flowers with the
co-ordinating stamps. Heat emboss some of them if you like.
· Stamp the Happy Birthday sentiment onto cream card and cut out (either by hand or a Spellbinder die if you have one that fits). Distress the edges.
· Take your chosen paper and cut it to measure 8 x
8 inches. Stamp the corners with the corner flourish and heat emboss with the
sparkly blue embossing powder. Now adhere to the card base.· Stamp the Happy Birthday sentiment onto cream card and cut out (either by hand or a Spellbinder die if you have one that fits). Distress the edges.
· Take the 2 decorative flourishes and decorative heart and distress the edges.
· Using the Decorative Heart die cut out an aperture on the front of the right hand side of the card at an angle. Close the card and with a pencil lightly mark the centre of the heart (this will be on the inside of the card) and now stamp here on the inside of the card with the Vintage Floret background stamp at the same angle as the aperture.
. Stamp 4 flourish corners onto the inside of the card.
· Close the card and adhere one of the decorative hearts in place so that it fits inside the aperture, but on the inside of the card.
· Now adhere the April release flourishes , decorative heart on the front of the card as in picture, it is supposed to resemble a butterfly.
· Make up the flowers and adhere 3 of them on the top left hand corner (keep 1 small flower for the butterfly antennae)
· Adhere the other 3 flowers inside the heart aperture on the inside of the card, (do this whilst the card is closed to ensure they do fit inside the heart aperture).
· Either make the pearl decorative pins yourself or use some bought decorative pins and adhere to the top of the heart aperture, as to resemble the butterfly antennae’s. Use the final small Vintage Floret to hide the glue as you do need to make sure that these are fully secure.
· Decorate the inside of the card with the remaining elements that you have left including the plain sentiment box.
· Add the sentiment to the front of the card as in picture.
· Adhere the 6 tiny blossoms onto the butterfly wings.
· Finally adhere the brads and pearls and add some stickles glitter to finish.


So many wonderful details on your stunning pages Nikki, a lot of work has gone into these and they´re equally fabulous! Have a great weekend, hugs, Ira xox
ReplyDeleteirascreacorner.blogspot.nl
Oh both these projects are winners for but my #1 fav is the layout . Love the soft colors and all the dies and layering. Very pretty .
ReplyDeleteHi Nikki - I do hope you are selected for the HC team - you certainly display amazing talent and beautiful artwork! I love this layout, and your pretty card. Such ingenuity! Beautiful, Nikki - just lovely and beautiful! (did I say beautiful?) hugs, de
ReplyDelete{Creative Smiles}
Hi Nikki, thanks so much for following me. I'm am now following you. Lol. Yes so lovely to meet you today, really enjoyed the day with you lovely ladies. Lou was brill, a fab teacher. Be great to keep in touch. Happy crafting!!!
ReplyDeleteLou. Xx
Stunning projects both equally beautiful - you certainly deserve a place on the team :) xx
ReplyDeleteStunning projects Nikki and good luck you would be fabulous,lovely to meet you today.
ReplyDeleteLouise xx
ooooooooh these are lovely!!!looooooooovely...... whew hewwwwwww uh yeah big lesson send it off asap and no seconds hahahah
ReplyDelete