Friday 29 November 2013

Black Friday - Heartfelt Creations Release

A very good morning to you all! I hope you all had a lovely Thanksgiving:) x
Today is a Black Friday special release from Heartfelt Creations.
We are pleased to present the Floral Key Collection. This collection contains a neutral colour palette with card panels, papers, stamps and dies that will enable you to create quick cards while achieving the "wow" factor. The Floral Key Collection is a set of key and lock stamps and dies with a paper pack that contains a variety of card fronts, 6" x 6" pieces and 12" x 12" layouts with borders and frames. It's a creative, fun exploration of the vintage spirit. The Floral Key Collection will unlock your imagination to creating incredibly beautiful, "fine art" cards. Take advantage of extra savings when shopping with Heartfelt Creations on Black Friday.
This collection was released over here in the UK last week on Create and Craft by Julia Watts  ..... and guess what? My project that I am sharing with you all today was one of the samples shown!!!  I am one happy bouncing bunny at the moment as my crafting has just exploded into such an amazing, not now being just a hobby, but a career:).....Ooooops I nearly let the cat out of the bag lol:) But I promise to announce soon my very! very! exciting news:) x
Ummm I am getting carried away so let me get back to this wonderfully gorgeous collection from Heartfelt Creations.......The Floral Key Collection!


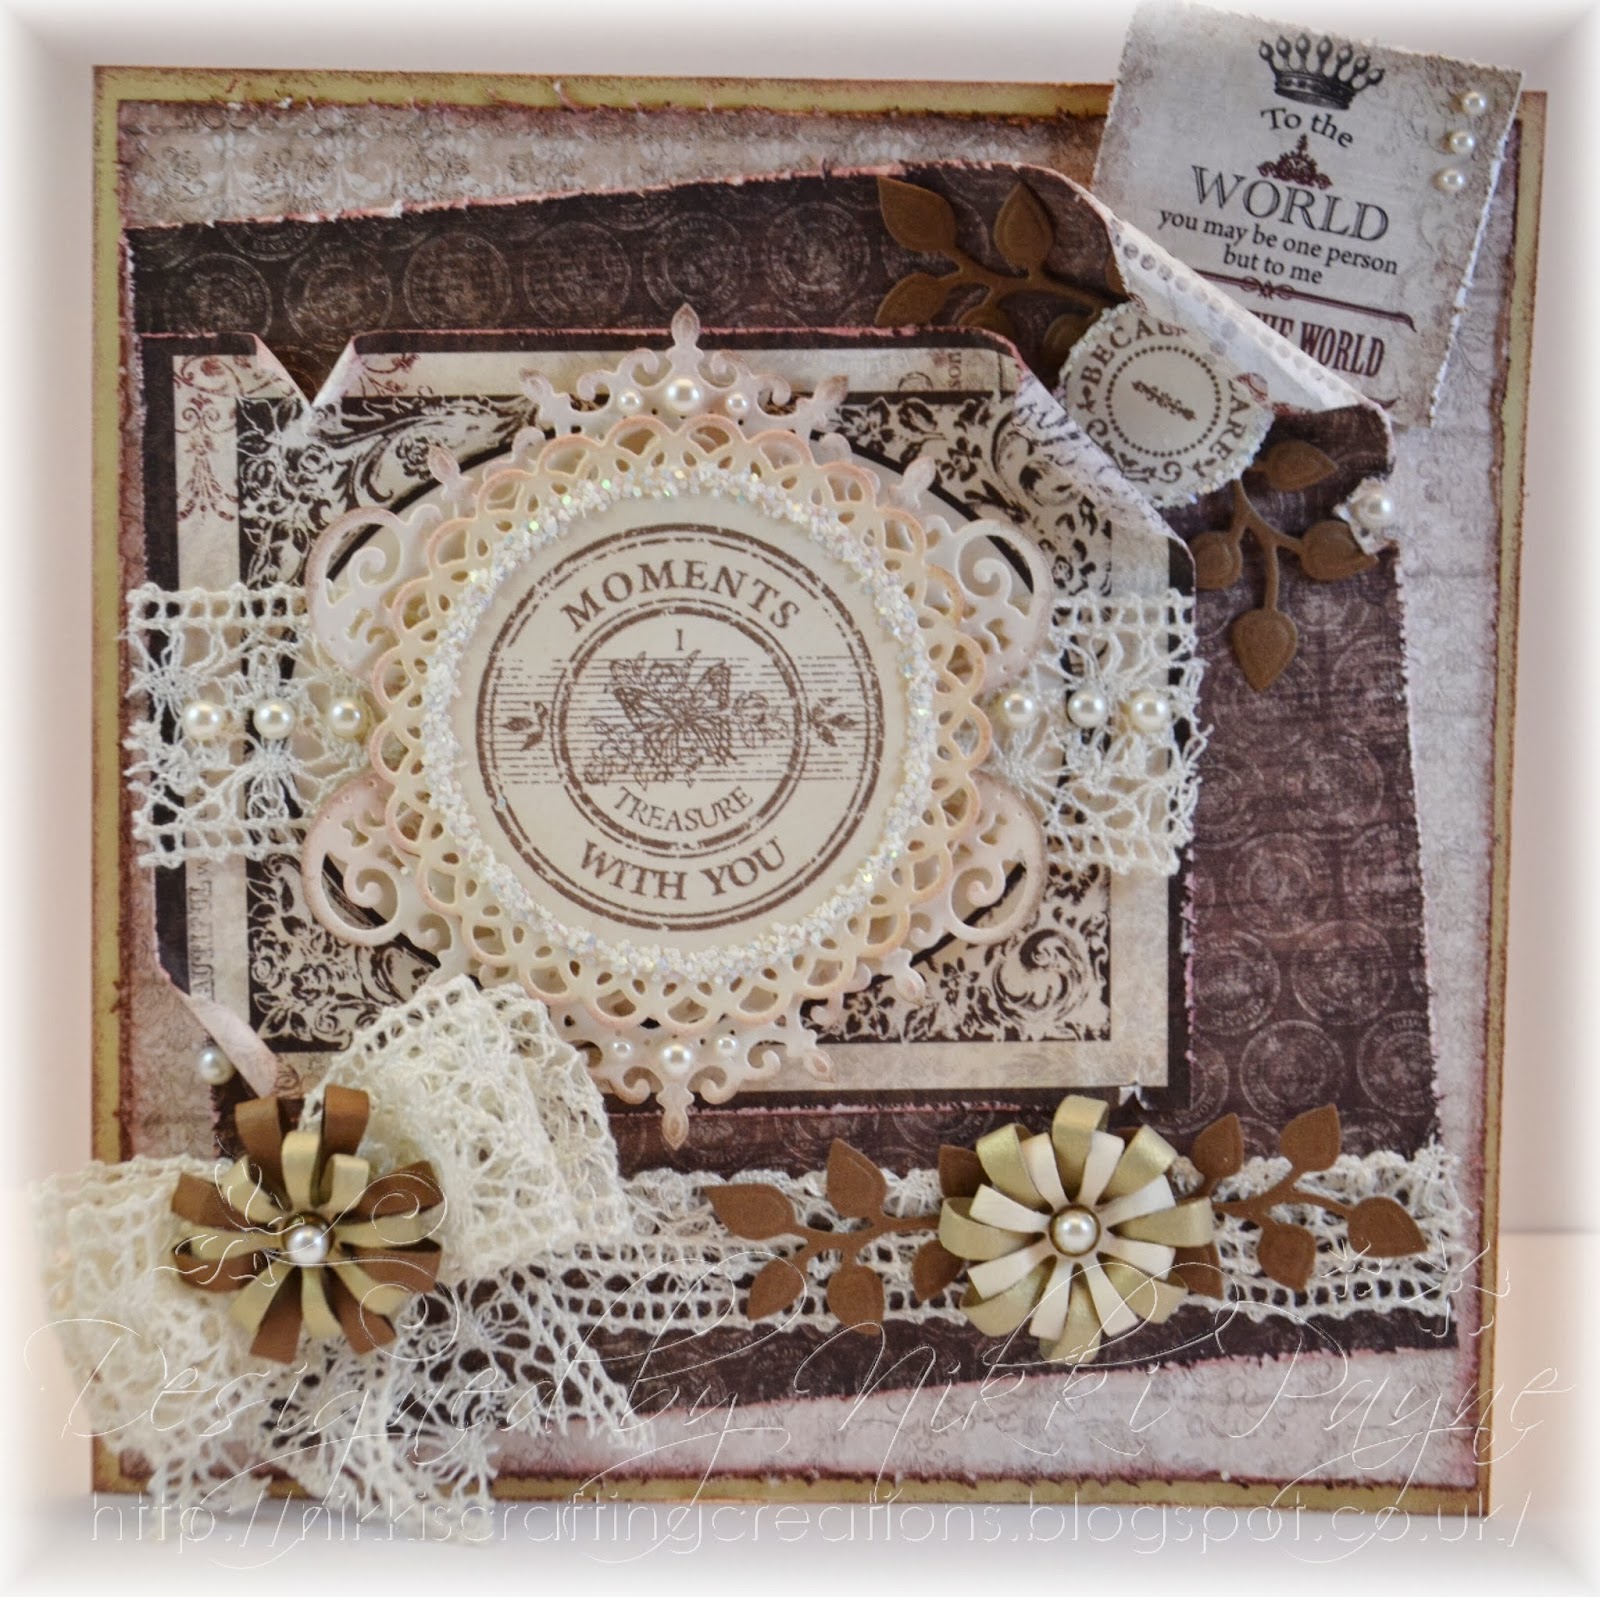
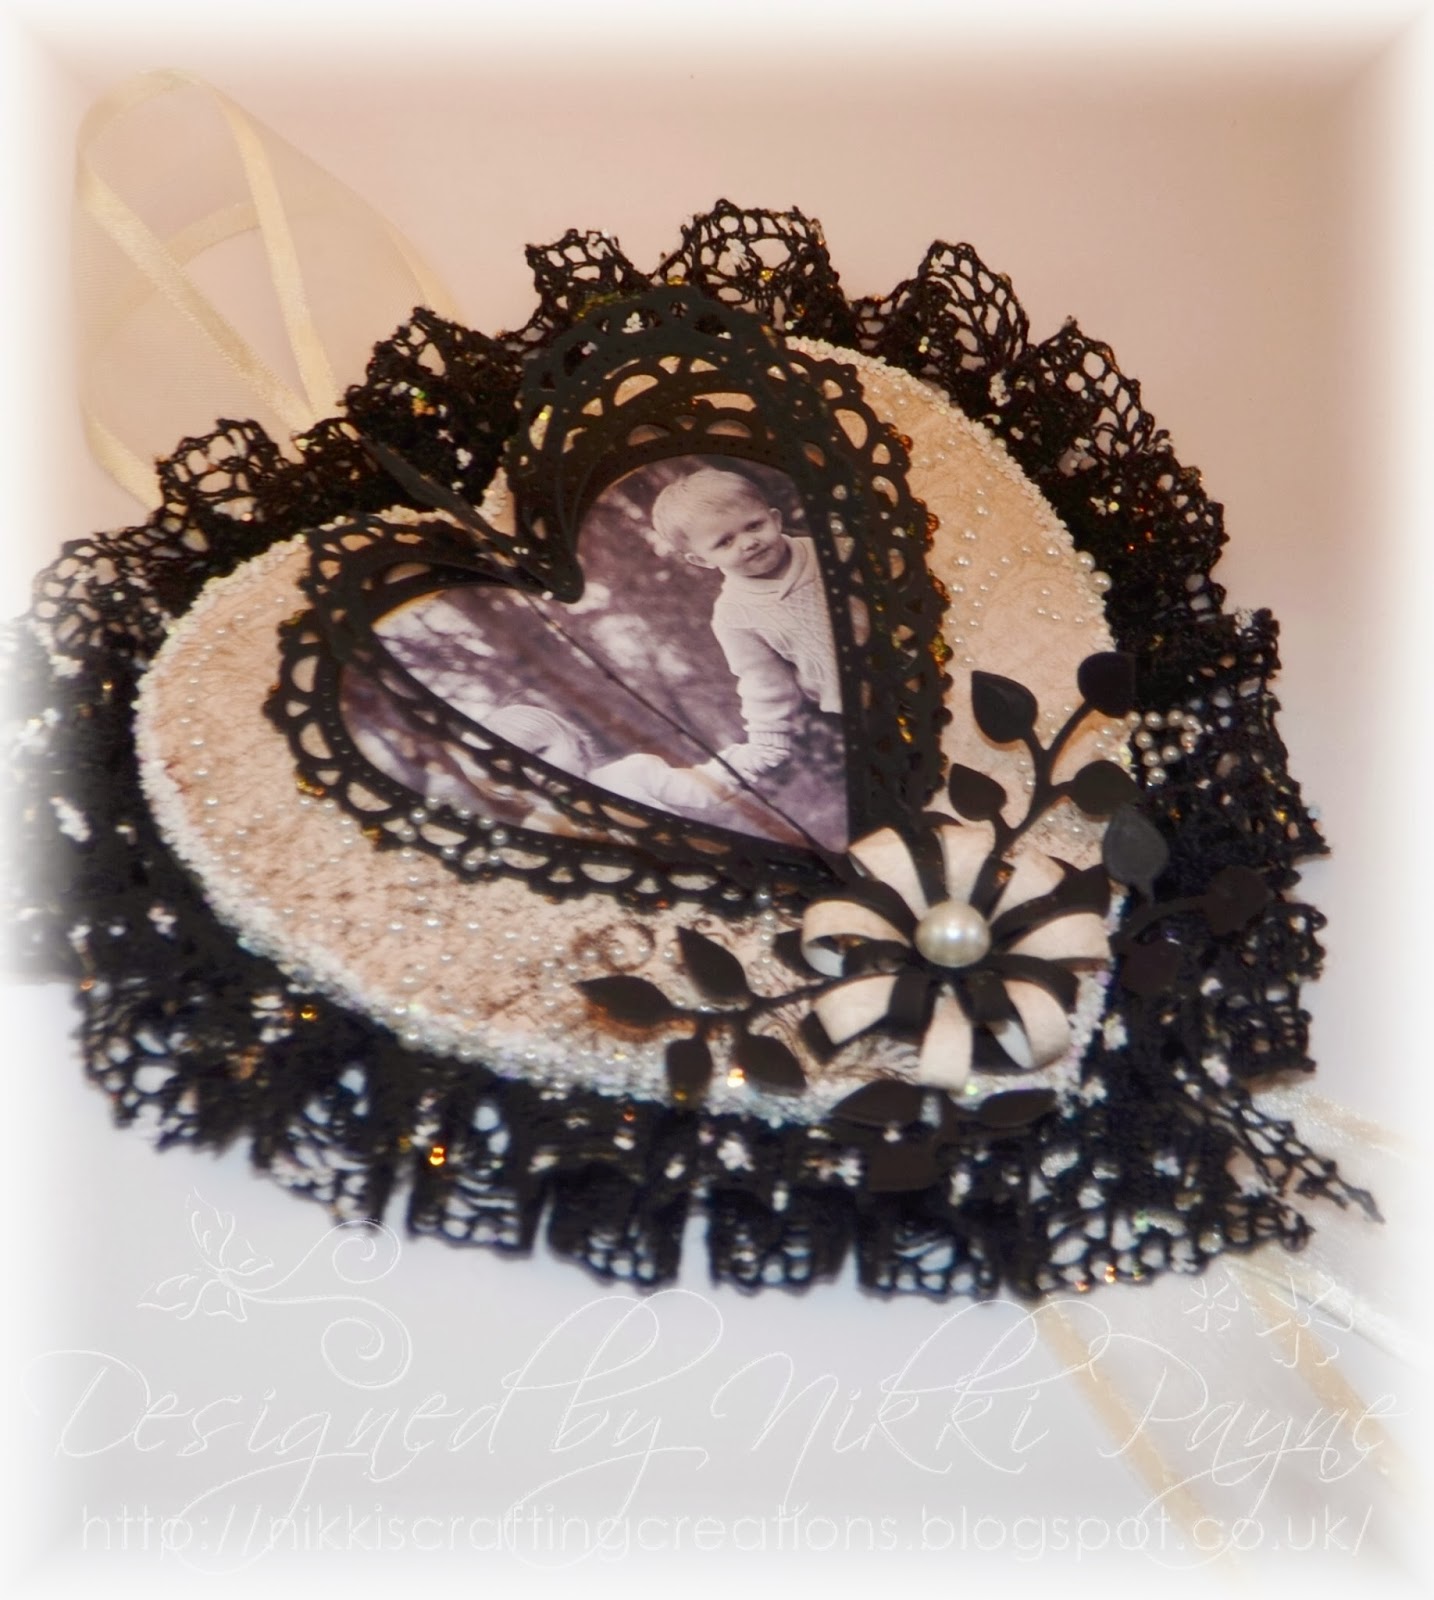
Here you can see that I have adorned the lid of the box in deep purple flowers  using the Vintage Floret stamps and matching dies and cascaded them down the sides.
I have coloured the decorative heart and the key in using Cosmic Shimmer Acrylic Drawing Inks.


I have used 4 of the stamps from the collection
for each side of the box and coloured them in with distress markers and the keys in with Cosmic Shimmer Acrylic Drawing Inks which gives them a metallic vintage effect.             


Heartfelt Creations and products Carried by HC
HCD 728 Timeless Amour die set
HCD 727 Vintage Floret die set
HCD         Burnished Key die
HCPC 3502 Mini Vintage Floret precut set
HCPC 3500 Open Vintage floret precut set
HCPC 3546 Classic Leaf precut set
HCPC 3571 Keys and Roses precut set
HCPC 3572 Floral Keys and Locket precut set
253731 Decorative Labels One
088599 Captivating Squares

Other Products Used:
Pale green card, for the base box and lid, Purple card, cream card, stickles glitter – Diamond, Distress inks – Old paper, Shabby Shutters, milled lavender, Distress Markers – forest moss, frayed burlap, shabby shutters, spun sugar, dusty concord, milled lavender, seedless preserves, Cosmic Shimmer Acrylic Drawing Inks – Rich Gold, and Ancient Copper, Gold Gilding Wax, Flat Single pearls, Creative Expressions – Pearl Swirls, Acetate, Score board, die cutting machine, Adhesive, foam pads,  strong double sided glue, Memento Ink – Sweet Plum, Archival Ink – jet black
Instructions:
Begin by making your base of the box – mine measures 4” square, using pale green card. Make a lid about ¾” in depth, again in pale green card.
Die Cut: 5 x Captivating Squares in purple, 4 Timeless Amour decorative hearts in deep purple(you only need the outer die cut), about 7x open leaves and stamp with co-ordinating die, a selection of Vintage Floret flowers in purple, stamping with the co-ordinating stamps and adding a little gold gilding wax to the edges, (enough to make a nice cascading cluster), 5x Decorative Labels One in cream card, 4x Timeless Amour Decorative Hearts in cream(you will only need one outer die)-stamping 4 of the heart locks onto them using the Plum Memento ink, One set of the Burnished Key die set, stamping just one of the fancy keys(I used the Sweet Memories one, the others can be used in another project).
Distress the edges of the box with the distress inks listed above.  Colour the Heart Locks in using the Acrylic inks and adhere to each side of the box along with the decorative purple hearts that you die cut earlier. Choose some stamps from the collection and stamp onto 4 of the Decorative Labels One squares and colour them in with the distress markers and Acrylic Drawing Inks. Distress with co-ordinating distress inks.  Cut 4 pieces of acetate measuring 4” long and about 1 and ¼” wide, score down the middle to make a right angle. Adhere strong double sided tape to the outer edges length ways and adhere them to each inside corner of the box lid. Now adhere the 4 Purple Captivating Squares to the acetate and mat the Decorative Labels One with your images to each of them as in picture.  Next take the remaining Purple Captivating square and adhere to the top of the lid with foam pads and mat the last Decorative Labels one onto it.  You can now adhere the flowers and leaves in a pleasing cluster, draping them down 2 adjacent sides (this is when you need to decide which image you want to be the front of your box) Add a small flower and 2 small leaves to the top right hand side of the front of the box. Take the cream decorative outer Heart and paint with the Acrylic Drawing Inks adhere this just under your flower cluster so that it sits away from the box.  Cut 3 lengths of purple card about ½” x 11” in length, glue these together just under a flower, loop over and down the side and adhere in position as in picture and add a flower where they meet. (Cut them different lengths) Colour the key in and adhere this to the right hand side of the heart. Add flat pearls to the centre of the flowers and the pearl swirls down the sides of the box.  Add a little stickles  glitter to finish.

I hope you have found my instructions helpful! However if anyone would like any further help with how I have constructed the box please don't hesitate to ask.
This really is a very versatile collection, so if you head on over to the Heartfelt Creations blog you will find lot's of inspiring creations from all the other design team members!


Thursday 28 November 2013

Celebrate

Good Morning fellow bloggers:) x
Happy Thanks Giving to all my American friends and followers....I hope you all have a good one!
Today I have a just quick post! It is a very exciting day for me today and I am busy preparing:).....I will reveal very soon so do keep a look out on my blog and Facebook:) x
My card today is another 3 in 1 Couture Creations card that I made for Julia Watts Creative Expressions Create and Craft shows a few weeks ago.
 For this one I have used the Ornate Frame set again.

Products that I have Used:
  • Couture Creations 3 in 1 set - Ornate Frame
  • Spellbinder die - Fanciful Lattice and Ribbon Banners
  • Creative Expressions: paper pad by Teresa Collins, Pearl Swirls, Cosmic Shimmer Mica Powders: Dark Bronze, Copper, Red Bronze and Stickles Glitter - Platinum
  • Ribbon is from my crafty stash
I hope you all enjoy the rest of your day:)


Tuesday 26 November 2013

Another Seen On TV :)


A very Good morning fellow bloggers x
Today I am sharing a very quick make with you.....ok quick for me:) but honestly it took about 30 minutes in total. I made this for Julia Watts Heartfelt Creations show on Sunday on Create and Craft and was thrilled when I saw it:). The 2 gorgeous little children in the photo are my grandchildren Amelia and Ollie....you could choose to use a stamp or topper for your main image but I thought this photo was perfect:)


I began with an MDF heart and covered it in the Heartfelt Creations Antiquity paper, turned it over and glued the lace edge on the back using the box pleat method.......For any of you that are not sure how this is done I will be doing a video tutorial on it! I know I have been promising video tutorials, but honest they are coming soon. It is just that I am so busy making samples and prepping for my 'exciting news' that I have had to put the videos on hold for a while....but they are coming:)
The flower and leaves are the Sweet Juliet die, again from Heartfelt Creations and so are the decorative hearts....these are the Timeless Amour dies, which are one of my favourites amongst the Heartfelt Creations collections:)
As far as I am aware the Sweet Juliet dies sold out in the show however if you would like to purchase them Sir Stampalot have some in stock.

Products I  Used:
  • MDF Heart - Approx. 5".....The overall finished heart is about 7"
  • Heartfelt Creations products: Sweet Juliet Die Set, Timeless Amour Die Set, Antiquity Paper collect.
  • Cosmic Shimmer: Glitter Jewels -White Ice
  • Creative Expressions - Flat Pearls, Swirl Pearls, Black Lace and Black Foundations cardstock.
  • The cream organza ribbon is from my stash
I will be back soon to share another as seen on TV creation:)


Monday 25 November 2013

As seen on TV......3 in 1 Couture Creations

Good morning everyone! I hope you are all well and had a good weekend:) x
I have another card to share with you today which I made for Julia Watts Creative Expressions shows a few weeks ago featuring the fabulous 3 in 1Couture Creations sets....Stamp, emboss and cut. These really are so versatile....

 
 Products Used:

 
  • Couture Creations 3 in 1 set - Pattern Quilt.
  • Paper Pad - Creative Expressions by Teresa Collins
  • Ribbon - Creative Expressions
  • Spellbinder dies: Gold Majestic Circles and Jewel Flowers and Flourishes by Julianna Hudgens
  • Cosmic Shimmer Acrylic Drawing Inks and Gilding Wax - Golden Light
  • 7" x 7" card base.
  • Black Dazzler - Creative Expressions
Sorry this is just a quickie post today, but I am a busy crafter at the moment spending most of my time making more samples.....by the way did you see the Heartfelt Creations shows yesterday with all those luscious stamps, dies and the Antiquity paper pad? .......I was again so excited when I saw my cards and box amongst the other gorgeous samples:) I hope they all inspired you!
I will be sharing the box with you all on Friday with a tutorial on how I created it and all the other samples during the next few weeks.....and that exciting news.....Soon to be revealed:) x
See you all tomorrow :)

Saturday 23 November 2013

Blog Candy Winner #4

Evening everyone! Just a quickie to announce the fourth winner of my blog Candy............................................................................................................................And Lorraine it is you:) Congratulations x If you email me your details I will post of you box of goodies :)
Thank you all for taking the time to visit and comment on my blog.....I love ready them:)
Big apologies that I haven't had time to visit all of your blogs lately, but I have been working very hard in my craft room on my soon to be revealed exciting news....... I promise it won't be long now before I can tell you all:)
Oh and just to let you all know that if you tune in to Create and Craft tomorrow for the  toolshed, Julia Watts will be revealing some gorgeous new products from Heartfelt Creations.......oh and see if you can spot some of my cards in amongst the samples:) x
Take care, and I hope you all have a lovely weekend
I will be back soon with a card to share with you all!

Friday 22 November 2013

As seen on Create and Craft - Couture Creations 3 in 1 set

Good morning fellow bloggers. I have a card to share with you all today that was a sample card shown on Create and Craft last week on Julia Watts 3in1 Couture Creations shows for creative Expressions.
I made 6 cards in all for the shows and will share them with you over the next few days.

Couture Creations - Ornate Frame:


The set comprises of a clear Stamp set, co-ordinating Embossing folder and butterfly dies. These sets make it easy for any level crafter, whether you are a beginner or have been crafting for many years.
You can use different techniques to produce lot's of different effects just using the one set as the Creative Expressions design team showed in there amazingly inspiring projects they all made for the shows.
Products that I have used:
  • Couture Creations 3in1 set - Ornate Frame
  • Papers - Teresa Collins -Creative Expressions
  • Stickles glitter - Diamond
  • Spellbinder die - 5x7  Detailed Scallops

Wednesday 20 November 2013

Heartfelt Creations Wednesday

Good morning everyone. Today I have my Design Team card for Heartfelt Creations to share with you.
For lot's of fantastic and inspiring ideas visit the Heartfelt Creations blog HERE......The Design Team have all been very busy creating some gorgeous projects:)


For that Special Day
Heartfelt Creations Products and Products Carried by HC
HCDP1 234 Daphne Paper Collection
HCD 728 Timeless Amour Die set
HCD 701 Posy Patch die set
HCPC 3303 Posy Patch pre cut set
HCPC 3363 Inspire Me Sentiment pre cut set
HCD 736 Classic Leaf die set
HCPC 3545 Open Leaf pre cut set
HCD 735 Gift Ensemble Die
031459 Gold Labels Four
Other Products Used:
Pearl swirls, Cosmic Shimmer Pearlescent pva glue – Vintage pink, flat ivory pearls, stickles glitter – diamond, very pale pink, pale green and cream card stock, embossing ink, Cosmic Shimmer embossing powder – Ruby Lapis Lustre, Distress ink – Spun Sugar and tea dye, adhesive, 3D foam pads, heat embossing tool and cutting machine.
Instructions:

Begin with a 7”x7” pale pink card blank. Choose 2 pieces of patterned paper from the Daphne collection and cut one piece 6 ½” square and the other 5 ¼” x 5 ¾”. Distress the edges putting a small tear in the top right hand corner of the 6 ½” square, ink with the tea dye distress ink and mat onto your card base.  Choose a decorative panel and cut out of the paper, distress the edges and mat onto a piece of cream card. Ink the edges of with a little tea dye distress ink and put to one side. Die cut enough flowers to make 1 large, 2 medium, 1 small and 1 single small in pale pink card. Ink and stamp the flowers with embossing ink, sprinkle the embossing powder over and heat with a heat embossing tool.  Make up the flowers. Die cut and stamp with the co-ordinating stamp 3 leaves in the green polka dot paper from the Daphne papers. Die cut 3 decorative leaf flourishes from the Gift Ensemble die set in pale green card.  Die cut the small heart and the decorative open heart from the Timeless Amour die set in cream card. Distress the edges with the tea dye ink. Stamp the sentiment onto cream card and die cut out with the smallest die from the Gold Labels Four.

You are now ready to assemble the card – Adhere the panel to the top right hand corner at an angle using 3D foam pads. Add the 2 hearts and assemble the flowers, leaves (cut 3 small leaves off) and decorative foliage swirls (cut a piece of small foliage swirl off of one) in a cluster to the bottom right of the card. Adhere a flower and the small foliage swirl and 2 small leaves to the top left of the panel. Add the small single flower to the inside of the tear. Add the pearls to the centre if the flowers. Add the pearl swirls. Finally add some stickles glitter and the pearlescent pva vintage pink dots to the outer border edge of the card.


Sunday 17 November 2013

Moments I Treasure With You

Good afternoon fellow bloggers. I promised earlier that I would be back to share the card that I made yesterday at Sir Stampalot and here it is:


These flowers have been made using the Posy Patch stamp and matching die. I have stamped onto the patterned papers from the Daphne collection and used Cosmic Shimmer Embossing Powder - Ruby Lapis Lustre. I have added a little Stickles Glitter glue - Diamond to the edges.


The sentiment is from the Moments With You pre cut stamp set. I have again used the embossing powder and also used Cosmic Shimmer White Ice around the outer edge.


I have used Heartfelt Creations products:
  • Daphne paper collection, Timeless Amour die set, Sweet Juliet flower die, Open leaf stamp and co-ordinating die set - Classic Leaf, Posy patch flower and co-ordinating die set, Ornate Gateway die set.
  • Spellbinder dies: Floral Ovals and Standard Circles
  • Other products used: Cosmic Shimmer - Embossing Powder - Ruby Lapis Lustre, Stickles glitter glue - Diamond, Distress inks - tea dye, spun sugar, Cosmic Shimmer:Mica powders - Frosted Mallow, Ruby Red, Cosmic Shimmer - White Ice, and Creative Expressions American Seam Binding.

Blog Candy Winner #3

A very good Sunday morning to you all x I hope you are all having a lovely fun filled weekend:)
I had a really wonderful day yesterday demonstrating some gorgeous Heartfelt Creations and Spellbinder products at Sir Stampalot in Peterborough and made lot's of new crafting friends:) x That is one of the amazingly fab things about demonstrating, not only do I get to create but I get to interact with like minded crafters:).....I am just loving it:) x
Now my exciting news which I have been telling you about is soon to be revealed......I know it has been a long time coming but in just a few weeks I can announce it! AND it is the most exciting ever:)
However for those of you that tune in to Create and Craft you have probably seen my cards on the Julia Watts shows....featuring the gorgeous stamp, emboss and cut products by Couture Creations....these are such fun products to work with and I was asked if I would like to contribute to some samples for the shows....now how could I turn that down, Julia even mentioned my name!!!! Wow! You can imagine me jumping up and down with excitement:) x I will be sharing my cards that are on the shows this week so be sure to pop in on my blog. Julia has a tool shed show on today at 12-2pm so tune in to see these gorgeous products and samples from the Creative Expressions design team, Sue Wilson and of course ME!! x
I will be back later to share a card that I made at Sir Stampalot yesterday, but until then I have the winner for this weeks blog candy to reveal. Who is........................................................................
..................................................Nattyboots - Elaine H!!!!!  Congratulations!!! x
If you email me with your address I can send you your box of goodies:)
So that's  all from me for now, but I will be back shortly with my card!
Enjoy the rest of your day:)

Wednesday 13 November 2013

Heartfelt Creations Wednesday

Good evening everyone, I hope you are all having a good week x
I am unusually late with my post today, but I have had a very hectic couple of days......crafting of course:) I can share these creations with you next week:)
For a sneak peak at the new Heartfelt Creations collection head on over to the blog HERE. You will also find some amazing inspiration from the Design Team:)

Today I have 2 Heartfelt Creations cards using the Sweet Juliet collection.

Just For You


Products Used:
HCPC 3563 PostCard PreCut Set
HCD 740 Sweet Juliet Die
HCD 729 Decorative Blossom Corner Die
HCDP1 237 Antiquity Paper Collection

Project Instructions:
Other products: A2 Locking Loops, Tapestry embossing folder, Tim Holtz distress inks – a range of pinks and greens, Cosmic Shimmer – Pearlescent Mica Powder, Versafine Ink - Vintage Sepia, Cream and dusky pink card stock, gold shimmer card or paper, Creative Expressions decorative swirl pearls and flat pearls, Pink twine, pale pink ribbon, Cosmic Shimmer polished glitter- Golden Sand, Cosmic Shimmer Gilding Wax – Enchanted Gold, Cream decorative lace
Instructions: Make a 7" x 7" card base and adhere dusky pink card to the front. Cut a piece of cream card 6 1/2" square and put through the die cutting machine with the embossing folder. Using your finger, lightly go over the embossed area with the gilding wax. Adhere to the front of the card. Stamp the post card image onto some cream card, colour with distress inks, distress the edges a little and cut out. Die cut out the A2 Locking Loops onto dusky pink card. Die cut the smallest of the corners out, again onto dusky pink card. Matte the postcard onto the A2 locking loops, adhere the Blossom Corner from behind and adhere about 1/2" from the top of the card centrally (adhere a length of lace just below where the post card will sit as in picture). Die cut 3 large and 3 small Sweet Juliet Flowers. Colour them in using shades of pink to coordinate with the post card and make them up. Die cut 3 of the leaves, cut them in half. Cut out a sentiment from the Antiquity paper. Add 3 lengths of pink twine adhering it at the right hand side of the card where the sentiment will be as in picture. Adhere the flowers and leaves in a cluster at the bottom left of the postcard adding a bow under the bottom flower made of pale pink ribbon and twine. Adhere the sentiment adding 2 leaves to the top left hand side. Using the Mica Powder and water, make Mica Powder paint and add some to the post card, flowers and leaves to give a subtle shimmer. Add a pearl swirl to the top left of the sentiment. To finish add some glitter around the outer edge of the cream embossed card and the outer edge of the post card using a glue pen – You may find it easier to do this as you make up the card, however make sure it is dry before going on to the next step.

You Are So Beautiful

Products Used:
HCD 740 Sweet Juliet Die
HCPC 3566 Beautiful Juliet PreCut Set
HCD 734 Sun Kissed Fleur Die
HCD 737 Ornate Gateway Die
HCPC 3533 Sun Kissed Fleur PreCut Set
209493 Grand Decorative Ovals One
031460 Opulent Ovals
354804 Oval Small

Project Instructions:
Other products: Cream and red cardstock, small and medium cream flat pearls, Parchment or vellum paper, Black Archival ink, Cosmic Shimmer acrylic Drawing Ink, Distress ink – Fired Brick, embossing ink – Cosmic Shimmer Vintage Golden White, Pearl Brads, Organza ribbon, Stickles Glitter – Platinum, foam pads
Instructions: Die Cut out the decorative ovals in cream card using the second from largest die x2 and make your card base,(whilst in the die distress one of the ovals that will be your card front with Fired Brick). Die cut out another Decorative Oval the next size down and matte onto the front of the card using foam pads, (Distress the edges with a little Fired Brick distress ink). Die cut the largest Opulent Oval in red card. Die cut the decorative arch in red card and adhere this from the back of the Opulent Oval so that the tip of it reaches the top of the card base when in position. Adhere this to the centre of the card with foam pads. Stamp the image/sentiment onto cream card and colour in using the Acrylic Drawing Inks. Die cut out using the largest of the small ovals and distress the entire image with fired brick. Matte this onto the centre of the Opulent Oval. Die cut a small and large Sweet Juliet Flower in red card and make up the flower and adhere together with a pearl brad. Stamp and heat emboss the Sun Kissed fleur and die cut out with the co-ordinating die set. Die cut out 2 leave sets, cut them in half and distress a little with the Fired Brick Distress Ink. Adhere the Sweet Juliet Die onto the largest Sun Kissed Fleur flower and adhere to the bottom left of the image on the card along with the leaves. Add 3 small ribbon tales just under it. Make a small bow and adhere to the top right of the card. Add a layered Sun Kissed Fleur flower and brad to the centre of the bow. Add some pearls around the smaller Grand Decorative Oval. Add pearls to the leaves, arch and flower petals. To finish add a little stickles glitter.


Sunday 10 November 2013

Blog Candy Winner!

Evening everyone x
Just a quickie post to reveal my second Candy Winner......,...Who is.....................................................................Carole Z:) Carole if you could email me your details and I will get your goodies sent off to you. Thank you all for your wonderful comments and don't forget I will be revealing another winner next week:) x
Whilst I am here I would also like to thank all of the ladies that attended my class yesterday.....I had an amazingly brilliant time and will be announcing some more dates soon for the new year:) x
Thank you also to Janice and Andy for making me feel so at home at Sir Stampalot Peterborough:)  I will also be there over the next 4 Saturdays demonstrating so if you live near by it would be nice to see you:) x
Bye for now! I will be back soon with another creation:)

It's a Bling Thing - Lacy Sunshine Challenge

Good morning everyone. I am back to share my design team card for Lacy Sunshine....The challenge theme is 'It's a Bling Thing'.
I have used Sticky Wings - Frosti Sprinkles. I think when Heather designed this gorgeous little image she had the Holiday season in mind, however I have made a blingy birthday card using a very soft colour palette.

For all the details on the challenge hop on over to the Lacy Sunshine blog HERE and don't forget to check out the new Lacy Sunshine Etsy store for your instant downloads or visit the website here.
Even more exciting is the fact that Lacy Sunshine is now offering clear photopolymer stamps :) All the details are on the blog!
  • I have coloured my image in using distress inks.
  • Papers used are Maja Designs.
  • Spellbinder dies used: Romantic Rectangles, Persian Accents,Bitty Blossoms, Die D-lites: Medallion One, Sprigs and Blooms Three
  • I have used a Sakura Gelly Roll Clear Star pen to add the glitz to my image and some stickles glitter around the edge of the card.
  • I have used a Martha Stewart punch on my patterned paper.

Thursday 7 November 2013

Heartfelt Creations - Peace

Good morning fellow blogging friends. I hope you are all having a good week.
I have another Heartfelt Creations card to share with you today. This time I have gone for an elegant Cream on cream with a touch of gold...... Christmas card. For more inspiration from the other Design Team members hop on over to the Heartfelt Creations blog.


I have embossed the patterned background paper with a Spellbinder embossing folder. Used some Cosmic Shimmer  gilding wax -Pewter and then made a paint out of the Cosmic Shimmer Pearlescent Mica Powder and painted over the whole background and also on the stamp and Poinsettia flowers. This has given a really pretty, yet subtle shimmer to the card.


Products Used:
HCPC 3553 Peaceful Night PreCut Set
HCPC 3551 Holly Berry PreCut Set
HCPC 3557 Christmas Poinsettia PreCut Set
HCD 738 Ornamental Add On Die
HCD 734 Sun Kissed Fleur Die
HCD 728 Timeless Amour Die
088605 Decorative Labels Twenty Eight
031460 Opulent Ovals

Project Instructions:
Other products: M-Bossabilities - Twisted Heart Design A, Persian Accents, Cream cardstock, Creative Expressions Pearl Star Decorative pearls, Cosmic Shimmer Glitter Jewels – White Ice, Distress Ink – Tea Dye, flat cream pearls, small pearl brads, Fancy pearl button, Gold embossing powder, embossing ink, Cosmic Shimmer Gilding Wax – Enchanted Gold, Cosmic Shimmer Mica Pigments – Pearlescent, Cream Organza Ribbon, 1/4" cream satin ribbon, foam pads, adhesive, 7" x 7" card base, adhesive, Die Cutting Machine
Instructions: Begin with a 7" x 7" cream card base and distress the edges with Tea Dye Distress ink. Choose Some light cream patterned paper from the Timeless Amour paper collection. Cut it 6 3/4" square and emboss with the Twisted Heart Embossing Folder. Distress the edges and ink them with Tea Dye Ink. Using your finger add some of the gilding wax over the embossed area. Add a few little tears to add a little shabby look to it. Adhere this to the card and paint over a little with the pigment mica (make a paint by adding some Mica to a little water).Stamp the ‘Peace’ sentiment onto cream card and die cut out using the 2nd from largest die from the Opulent Ovals. Colour the letters and flowers in with some more Mica paint. Die cut a large Opulent Circle and a large Decorative Labels Twenty-Eight in cream card, ink the edges. Die cut 4 Holly Berry Swirls an ink with the co-ordinating stamps. Die Cut, Stamp and heat emboss with the gold embossing ink enough Sun kissed Fleur flowers to make one large, one medium, flower and some single flowers. Paint them with Mica Powder paint. Layer up the Opulent Ovals and Decorative Labels Twenty-Eight using foam pads and arrange the flowers and Holly Swirls as in picture. Die cut 2 Persian Accent Borders and ink the edges. Adhere them along the bottom of the card layering one on top of the other, one a little higher that the other. Adhere a length of ribbon along the top of the border and add some double sided tape. Take the top layer off the tape and add some Cosmic Shimmer White Ice. Make a small organza bow with a fancy button in the centre and adhere just under the flower on the right hand side of the card. Add some Cosmic Shimmer White ice to the centre of the flowers with a small pearl. Add the decorative pearl swirls, pearl brads and pearl stars to finish off the card.

I hope you like my card today:) x If you haven't already don't forget to join in with my Blog Candy giveaway......I will be doing another random org drawer on Saturday x The link is in my sidebar!
Take care everyone and I will be back soon with another creation soon:) x

Wednesday 6 November 2013

Heartfelt Creations Wednesday - Shabby Vintage

Good morning to you all x
It is Wednesday again and time for me to share some more Heartfelt Creations projects with you.
Be sure to hop on over to the Heartfelt Creations blog to see lot's of gorgeous projects made by the design team and take a look at the new members creation x
                                                  
For Someone Special - Shabby Vintage Card


Heartfelt Creations Products Used:
HCPC 3568 – Moments with You Precut set
HCDP1  237 – Antiquity Paper Collection
HCD  740 – Sweet  Juliet Die
HCD  737 - Ornate Gateway die
Spellbinder Dies:
Stately Circles
Other Products:
Cream Lace, Flat pearls, Cosmic Shimmer Glitter Jewels – White Ice, Small Brads, Tim Holtz Distress Tool, Die Cutting Machine, Distress Inks – Victorian Velvet, Tea Dye, Archival Ink – Plum, Memento Ink – Rich Cocoa, foam pads, adhesive,  cream and brown card, gold shimmer card, 7”x7” sand coloured card base
Instructions:
Begin with a 7”x7” card blank in a sandy colour or use a white card and adhere the sand coloured card on the front. Choose a light colour decorative paper from the Antiquity Paper Collection measuring 6 ¾ square, distress with the distress tool,  ink the edges and matt onto the front of the card. Choose a dark coloured panel from the Antiquity Collection, distress the edges and ink a little with the distress inks. Roll the right hand corner and add a little tear just under it. Adhere this to the card at an angle. Choose a smaller panel from the paper collection and again distress the edges and roll the right hand side corner and adhere this to the left hand side of the card towards the top just a fraction.  Stamp the Moments with you stamp, die cut out with the stately circle die and ink the edges just a little. Die cut 2 decorative arches from the Ornate Gateway die set and again ink the edges a little.  Adhere a piece of lace to the centre of the small panel. Using foam pads adhere the decorative arches and the stamped stately circle to the small panel as in picture. Take some lace and fold the top over and adhere with double sided tape and adhere it about an inch from the bottom of the car. Make a double lace bow and adhere this to the right hand side of the lace.
Die cut 2 larger flowers and 2 smaller Sweet Juliet Flowers and make up 2 flowers using 2 small brads. Die cut 2 leaves and cut them in half to give you 4.
Cut a small sentiment out from the paper collection and adhere this with foam pads under the rolled corner. Stamp the ‘Because I Care’ onto cream card, cut out and add some White Ice around the edge.  Adhere this under the other rolled corner along with 2 of the leaves.  Add one of the flowers to the centre of the bow and the other on the length lace with 2 leaves each side.
To finish add some pearls and some white Ice around the ‘Moments With You’ Stately Circle.

I will be back tomorrow to share another Heartfelt Creations card with you all.
Oh and don't forget I still have my blog Candy which you can find a link to in my sidebar:)
Bye for now x

Monday 4 November 2013

Belle of The Ball

Good morning fellow bloggers x  I hope you all had a good weekend:) x

 My card that I would like to share with you today:


Items Used:
  • Belle of the Ball stamp by Creative Expressions
  • Spellbinder die - Majestic Labels Twenty-Five, Fancy Tags Three, Rose Creations and M-Bossabilities folder Cabbage Roses Design A
  • Cosmic Shimmer Glitter Jewels - White Ice, Gilding Wax- Pewter, Acrylic Drawing Ink, pearls and lace
  • Heartfelt Creations - Open Leaf die and stamp
  • Decorative paper and card is from my stash. Versafine ink - Sepia, Distress Ink - Tattered Rose
Instructions:
  • Begin with a 7" square cream card blank. Cut a piece of deep rusty coloured card 61/4" square and matt onto the card.
  • Using the Rose Creations folder emboss it onto some peach card measuring 6" square (you will need to run the folder through the embossing machine twice). Rub the gilding wax over the embossed area with your fingers or a piece of cloth. Mat this onto some patterned paper that co-ordinates. Adhere this to the card.
  • Stamp the image and colour it in using the Acrylic Drawing Paints. Die cut it out and whilst still in the die distress a little using Tattered Rose distress ink. Add some gilding wax to the frame.  Adhere to the left hand side of the card at an angle.
  • Die cut the roses out, enough to make 4 flowers onto cream card and add some wet glue and cover with the Glitter Jewels.  Die cut and stamp 2 open leaves. Add a length of the decorative ribbon about 1/2"  from the bottom of the card. Adhere the roses onto the card to the bottom left of the image in a small cluster and one small rose on the top right hand corner.
  • Stamp the sentiment from the stamp collection onto cream card and die cut out using the tag die distress a little whilst still in the die with tattered rose distress ink. Adhere this to the card as in picture. 
  •  Add some pearls to the centre of the flowers, on the tag and along the lace. Also add some pearl swirls to the cluster of roses and to the single rose at the top of the card.
  • To finish I have added some more Glitter jewels to the outer edges of the card.
I hope you like my card today! Don't forget to join in with my Blog Candy....The link is in the side bar. I have already announced this weeks winner but will be doing another drawer this Saturday:) x


Saturday 2 November 2013

Blog Candy Winner !

Hi everyone just a quickie to let you all know that the random org thingy has picked this weeks winner of my blog candy who is................................................................Debbie x
Congratulations Debbie x If you could just drop me an email with your address I will get your goodies off to you:) x
Never mind if you didn't win this week, I will be drawing another name next Saturday :) x
I will be back soon with a card, so bye for now x